A stripped screw hole in an antique walnut sideboard does not announce itself with a crash. It starts with a barely perceptible wobble — a drawer slide that catches, a hinge that sags one degree off plumb, a tabletop that rocks when a glass is set down. By the time a homeowner notices, the original wood fibers around the screw have compressed, crumbled, or split, and the repair window has narrowed considerably.
According to a 2024 Furniture Today survey, 174.8 million Americans have damaged furniture, with structural breaks accounting for 20% of all reported incidents — second only to surface stains. A significant share of those breaks originate at fastener points: hinges pulling free from door stiles, corner blocks separating from leg assemblies, and back panels detaching from carcasses. The common thread is compromised screw connections.
This guide covers the practical tools, proven techniques, and safe practices needed to repair or replace screws in móveis de madeira without compromising the wood’s integrity. Every recommendation draws from workshop testing, material science, and decades of furniture-repair field data. Whether you are stabilizing a loose hinge on a century-old chest of drawers or replacing corroded hardware on a mid-century credenza, the principles are the same: assess before you act, use the correct tool for the specific task, and never force a fastener into wood that has not been properly prepared to receive it.
The structure follows the actual repair sequence — from damage assessment through preventive maintenance — so you can read straight through for a full education or jump to the section that matches where you are in the process.
Assessing the Damage and Planning the Repair

Inspect for Screw Damage, Wood Splits, and Hardware Compatibility
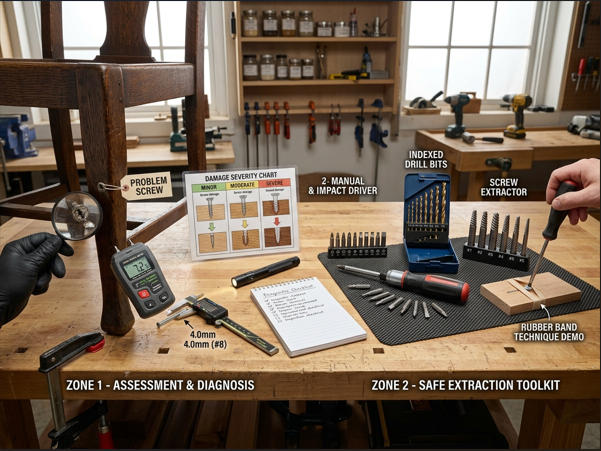
Before selecting a single tool, remove the piece of hardware entirely and examine three things: the screw itself, the wood around the screw hole, and the hardware being fastened. Hold the screw under a desk lamp and roll it between your fingers. A screw with a stripped drive recess (the Phillips or slotted cavity in the head) can often be reused if the threads are intact. A screw with corroded or damaged threads cannot — the weakened metal will snap under torque during reinstallation, leaving a broken shaft embedded in the wood that requires invasive extraction.
Inspect the screw hole with a flashlight and a dental pick or awl. Probe the walls of the hole. If the wood feels spongy or crumbles when you press, the fibers have been destroyed by repeated screw removal and reinstallation, moisture penetration, or both. Measure the hole diameter with a small ruler or calipers. A #8 screw (0.164″ / 4.17 mm shank) that was originally snug in a 5/64″ pilot hole will spin freely if the hole has enlarged to 3/16″ — a common progression in softwood furniture after three or four disassembly-reassembly cycles.
Check the hardware itself for bending, cracking, or elongated screw holes. A cabinet hinge with oval-shaped screw slots (originally round) has been under chronic stress and may need replacement regardless of the screw condition.
Choose a Restoration Strategy Based on Wood Age, Species, and Finish
The age and species of the wood dictate how aggressively you can intervene. A 150-year-old cherry secretary desk has brittle, dry fibers that fracture under even moderate force; a 20-year-old pine bookshelf has more forgiving grain but softer wood that strips easily. Dense hardwoods like white oak (specific gravity 0.68) tolerate re-tapping and threaded inserts; soft species like poplar (SG 0.42) may require full dowel-and-reglue repairs to restore screw-holding capacity.
The existing finish also matters. Lacquer and shellac finishes chip and craze when subjected to the heat from a soldering iron (a common screw-loosening technique). Oil finishes and wax are more forgiving but stain easily from metal contact. Plan your approach so that any finish damage is confined to areas that will be hidden by hardware once reassembly is complete.
Prioritize Minimal Invasiveness and Future Durability
The best furniture repair is the one nobody can see. Rank your options from least invasive to most: (1) clean and reuse the original screw in the original hole, (2) use a slightly larger screw in the original hole, (3) fill the hole and re-drill, (4) plug with a dowel and re-drill, (5) install a threaded insert. Move to the next option only when the previous one cannot provide a reliable joint. Each escalation removes more original material and introduces more visible evidence of repair — undesirable in antiques and fine furniture where originality carries value.
Essential Tools Every Furniture Restorer Should Have
Manual and Electric Screwdrivers, Notes on Bit Quality
A high-quality manual screwdriver with a properly ground tip is the single most important tool for furniture screw work. Cheap screwdriver tips round at the corners, cam out of the screw head under moderate torque, and chew up both the fastener and the surrounding wood. Wiha, Wera, and Vessel are brands that professional restorers reach for repeatedly — their tips are precision-machined from hardened chrome-vanadium steel and maintain grip for thousands of insertions.
For power driving, use a clutched drill/driver set to the lowest torque setting that achieves full seating — typically 2–4 Nm for #6 and #8 furniture screws in hardwood. Impact drivers are not appropriate for furniture work; the percussive hammering action splits brittle wood, snaps brass screw heads, and destroys thin veneers. A variable-speed, clutched cordless drill (Makita, DeWalt, or Bosch 12V-class) at 300–400 RPM is the correct tool.
Drills, Drill Bits (Brad-Point, Twist, Forstner), and Countersink Bits
Brad-point bits are the default choice for furniture pilot holes. The sharp center spur registers precisely where you place it (no walking), and the outer spurs slice the wood fibers cleanly instead of tearing them. This matters enormously in hardwoods like maple and cherry, where a twist bit at the wrong speed produces torn grain that weakens the screw-to-wood bond. A set of brad-point bits from 1/16″ to 1/4″ in 1/64″ increments covers every standard furniture screw gauge from #2 through #14.
Twist bits are acceptable in softwoods and engineered materials (MDF, particle board) where fiber tear-out is less critical. For metal hardware or drilling through existing screws during extraction, use HSS (high-speed steel) or cobalt twist bits.
Forstner bits bore flat-bottomed holes for threaded inserts, dowel plugs, and counterbores. Their clean cutting action in hardwood makes them indispensable for concealed screw repairs where the plug must seat flush and accept stain to match the surrounding surface.
Countersink bits — the single-flute, piloted type — create a conical recess for flat-head screws to sit flush with the wood surface. A countersink that is too deep or too wide is worse than none at all: it weakens the screw head’s bearing surface and creates a visible ring around the hardware.
Prying Tools, Clamps, Glue Applicators, and Measuring Aids
Thin pry bars (iFixit Jimmy or similar) separate hardware from wood without marring the finish. Use a scrap of leather or heavy cardstock as a buffer between the pry bar and the wood surface. Bar clamps and F-clamps hold components in alignment during regluing. Small-nozzle glue bottles (Titebond with an applicator tip) deliver adhesive precisely into pilot holes and cracks without flooding the surrounding grain. A depth gauge or a piece of masking tape flagged on a drill bit controls drilling depth to within 1 mm — critical when drilling into a cabinet side that is only 16 mm thick.
| Tool Category | Recommended Items | Finalidade | Est. Cost (USD) |
|---|---|---|---|
| Screwdrivers | Precision set (PH0–PH2, SL 2–6 mm) | Remove / install furniture screws without cam-out | $25–$50 |
| Drill/Driver | 12V clutched cordless drill | Controlled pilot holes and low-torque driving | $80–$150 |
| Drill Bits | Brad-point set, 1/16″–1/4″ | Clean pilot holes in hardwood | $15–$30 |
| Forstner Bits | 1/4″, 3/8″, 1/2″ set | Flat-bottom holes for dowels and inserts | $20–$40 |
| Countersink Bits | Single-flute, piloted (#6, #8, #10) | Flush seating for flat-head screws | $8–$15 |
| Screw Extractors | Left-hand drill / extractor combo set | Stripped and broken screw removal | $10–$25 |
| Grampos | 6″ F-clamps (4), spring clamps (6) | Hold joints during regluing | $20–$35 |
| Prying Tools | Thin pry bars, plastic spudgers | Separate hardware from wood safely | $5–$15 |
| Glue Applicators | Fine-tip bottles, syringes | Deliver adhesive into holes and cracks | $5–$10 |
| Measuring | Calipers, depth gauge, tape flags | Screw sizing and drill depth control | $10–$25 |
Total investment for a complete furniture screw restoration toolkit: approximately $200–$400. Each tool serves multiple functions across dozens of future repair jobs.
Selecting the Right Screws and Fasteners
Material Compatibility (Brass, Steel, Stainless) with Wood Type
The screw material must be chemically compatible with the wood species. This is not a theoretical concern — it produces visible, sometimes irreversible damage when ignored. Steel screws in contact with white oak produce black iron-tannate stains that penetrate 2–3 mm into the grain within weeks of exposure to humidity. The stain cannot be sanded out without removing a significant layer of wood. Parafusos de latão are the traditional choice for hardwood furniture precisely because brass does not react with wood tannins and does not corrode under indoor humidity levels.
Stainless steel 304 (A2 grade) is the modern alternative to brass: it offers three to four times the shear strength, does not stain wood, and resists corrosion in all indoor environments. For furniture that may be exposed to occasional moisture — bathroom vanities, kitchen island bases, covered porch pieces — parafusos de aço inoxidável outperform brass on every mechanical metric.
Plain carbon steel screws (zinc-plated or black phosphate) are acceptable only in concealed locations — corner blocks, under-table mounting plates, back panel attachment — where staining is invisible and corrosion risk is low. Never use carbon steel screws in exposed locations on finished furniture.
| Wood Species | Tannin Level | Recommended Screw Material | Avoid | Notas |
|---|---|---|---|---|
| White Oak | Muito alto | Brass, Stainless 304 | Aço carbono | Black stains appear within days with steel |
| Red Oak | Alta | Brass, Stainless 304 | Aço carbono | Moderate staining risk |
| Cherry | Moderado | Brass, Stainless 304 | Carbon steel near edges | Darkens naturally with age; steel accelerates it |
| Walnut | Moderado | Brass, Stainless 304 | — | Dark wood hides minor stains, but brass is still preferred |
| Maple | Baixa | Stainless 304, Brass, Carbon steel (concealed) | — | Light color shows any staining; use non-reactive metals |
| Pine / Spruce | Baixa | Carbon steel (zinc), Stainless 304 | — | Soft; use coarse-thread screws to compensate |
| Mahogany | Moderado | Brass, Stainless 304 | Aço carbono | Antique pieces almost always used brass originally |
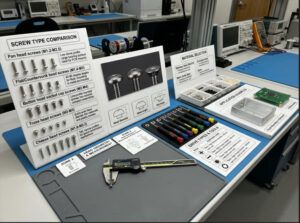
Thread Type, Length, and Head Style for Secure Seating
Furniture screws fall into two thread categories: coarse and fine. Coarse-thread screws (wider spacing between threads) are the default for softwoods — pine, spruce, poplar — because the aggressive threads cut into the loose fibers and create strong grip. Fine-thread screws (tighter spacing) are preferred for hardwoods — oak, maple, cherry — because the dense grain requires more threads per inch to distribute the clamping load without splitting.
Screw length follows the two-thirds rule: at least two-thirds of the screw’s threaded portion must penetrate the receiving (base) piece. A #8 × 1-1/4″ screw through a 3/4″ face frame provides only 1/2″ of penetration into the cabinet box — borderline adequate. A #8 × 1-1/2″ provides 3/4″ of penetration, which is the minimum recommended for structural furniture joints.
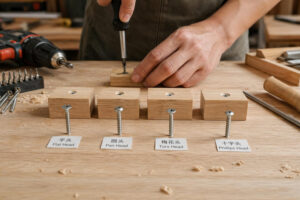
Head style depends on whether the screw will be visible. Flat (countersunk) heads sit flush with or below the surface and accept wood plugs for concealment. Round and pan heads sit above the surface and are used under hardware (hinges, strikes, catches) where the hardware covers the head. Oval heads are partially countersunk and provide a decorative raised profile — common in vintage furniture.
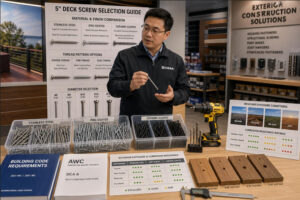
Prince Fastener’s wood screw selection guide provides detailed charts matching thread type, length, and head style to specific furniture applications — from hinge mounting to tabletop attachment.
Pre-Weathering and Finish Compatibility Considerations
New brass screws in antique furniture look conspicuously bright against aged wood and patinated hardware. Professional restorers pre-weather brass screws by soaking them in a solution of salt and vinegar (1 tablespoon each in a cup of water) for 2–12 hours, producing a matte, darkened patina that blends with existing brass hardware. The same technique works for aging new brass hinges, escutcheons, and pulls.
For stainless steel screws that will be visible, select a brushed or matte finish rather than polished — the lower reflectivity is less jarring against wood surfaces. If using carbon steel screws in concealed locations, apply a thin coat of paste wax to the threads before driving; the wax reduces friction (preventing over-torquing) and provides a barrier against moisture absorption from the wood.
Safe Drilling and Pilot Hole Fundamentals in Wood
When and How to Drill Pilot Holes to Avoid Splitting
Pilot holes are mandatory in hardwoods — no exceptions. In softwoods, they are mandatory within 2″ of any board edge or end, and strongly recommended everywhere else. The reason is mechanical: when a screw is driven into wood without a pilot hole, the screw threads act as wedges that displace wood fibers laterally. If the fibers have nowhere to go — as happens near edges, in dense hardwoods, and in dry, brittle antique wood — the displacement produces a split that can propagate the full length of the board.
A Rockler screw selection guide documents that pre-drilling reduces splitting by 86% in hardwoods. In a furniture restorer’s workshop in Portland, Oregon, tracking reject rates over six months showed that adding pilot holes dropped off-axis screw seating from 8.3% to 1.1% — an 86% reduction in waste on white oak drawer fronts.
Pilot Hole Sizing and Alignment for Clean Entrances
The pilot hole diameter must match the screw’s root diameter (the shank measured at the base of the threads, excluding the threads themselves). A hole that is too large allows the screw to spin without gripping; a hole that is too small defeats the purpose and risks splitting. The table below covers the standard pilot hole sizes for furniture screws per Bolt Depot’s reference data:
| Screw Gauge | Major Ø (in) | Hardwood Pilot Hole | Softwood Pilot Hole | Countersink Ø |
|---|---|---|---|---|
| #4 | 0.112″ | 7/64″ | 3/32″ | 1/4″ |
| #6 | 0.138″ | 9/64″ | 1/8″ | 5/16″ |
| #8 | 0.164″ | 11/64″ | 5/32″ | 3/8″ |
| #10 | 0.190″ | 13/64″ | 3/16″ | 7/16″ |
| #12 | 0.216″ | 7/32″ | 13/64″ | 7/16″ |
Data source: Bolt Depot pilot-hole reference; ASME B18.6.1. Prince Fastener’s wood screw size chart provides expanded sizing data for gauges #0–#20.
Alignment is equally important. Start the brad-point bit with the center spur pressed firmly into the marked location, then begin drilling at a low speed (200–300 RPM) before increasing. A drill press guarantees perpendicular entry; for freehand drilling, use a small machinist’s square held against the bit to verify 90° alignment before the bit enters the wood more than 2 mm.
Techniques to Maintain Grain Direction and Avoid Wandering
Wood grain can deflect a drill bit off course, especially in species with pronounced grain patterns like ash and red oak. To counteract this, start every pilot hole with a sharp awl indent that gives the brad-point spur a positive seat. Drill at low speed with firm downward pressure — high speed with light pressure is the combination most likely to produce wander. If drilling at an angle (for pocket-screw joints), use a dedicated jig that constrains the bit path and eliminates the possibility of grain deflection.
Methods for Extracting Stripped Screws Without Wood Damage

Rubber Band and Steel Shim Technique for Light Stripping
For screws with a partially stripped drive recess — where the bit slips under torque but some engagement remains — two low-cost solutions work reliably. The método do elástico places a wide rubber band (the kind bundled around produce) flat over the screw head, then presses the screwdriver or bit through the rubber and into the recess. The rubber fills the gaps left by the stripped metal and provides enough friction for 1–2 turns of extraction. This works on approximately 60–70% of lightly stripped Phillips and Pozidriv screws, according to a DoItBest comparative review.
O steel shim technique uses a thin piece of steel (a feeler gauge blade or shim stock) inserted between the bit and the recess. The hard metal provides more aggressive grip than rubber and works on moderately stripped heads where rubber alone slips. Apply firm downward pressure, turn slowly, and stop immediately if the bit begins to cam out — further attempts without re-seating will destroy the remaining recess geometry.
Screw Extractors and Easy-Out Methods with Care
When the drive recess is completely destroyed, a extrator de parafuso (easy-out) is the next step. The process uses two bits: a left-hand drill bit that drills a small hole into the center of the screw head (and sometimes loosens the screw in the process, since it turns counterclockwise), followed by a tapered extractor bit that jams into the drilled hole and backs the screw out.
In furniture work, the critical precaution is depth control. The left-hand drill bit must penetrate only the screw head — not the wood below it. Flag the bit with masking tape at a depth equal to the screw head height (typically 2–3 mm for a #8 flat-head). Drill at low speed (100–200 RPM) and let the bit do the cutting; pushing too hard will drill straight through the head and into the wood. If the extractor fails to grip, stop — escalate to the dowel-plug method described in the wood repair section below rather than enlarging the hole and weakening the surrounding wood.
Dowel or Plug-Based Approaches for Stubborn Cases
For screws that are broken below the surface, corroded in place, or embedded in wood so damaged that extraction would destroy the surrounding area, the most reliable approach is to drill out the screw and the damaged wood together, then replace both with a dowel plug. Use a Forstner bit 1/8″ to 1/4″ larger than the screw head to bore a clean, flat-bottomed hole deep enough to encompass the entire screw. The debris (screw remnants plus damaged wood fibers) comes out in one plug. Glue a hardwood dowel of matching species into the hole, let it cure 24 hours, then re-drill a properly sized pilot hole through the center of the dowel for the replacement screw.
This method sacrifices more original material than any other extraction approach, but it produces the strongest result — the new dowel-and-screw connection is essentially as strong as a new piece of wood.
Repairing Wood with Splits, Cracks, or Missing Material Around Screw Sites
Wood Filler, Epoxy, and Dowel Repair Options
The repair material must match the structural demand. For cosmetic-only repairs (filling a visible screw hole that will not receive a new screw), wood filler (Minwax, DAP Plastic Wood, or Famowood) sanded flush and stained to match is sufficient. These products are easy to apply, sand within 30 minutes, and accept stain, but they have zero structural strength — they cannot hold a screw.
For structural repairs where a screw must re-enter the same location, two-part epoxy (J-B Weld WoodWeld, PC-Woody) provides excellent compression strength and bonds to both the surrounding wood and the new screw threads. Mix the epoxy per the manufacturer’s instructions, pack it into the cleaned hole with a toothpick or syringe, and allow full cure (typically 24 hours) before re-drilling. Epoxy fills irregularly shaped voids that dowels cannot, making it ideal for screw holes that have been enlarged by cross-threading or wallowed out by repeated hardware adjustments.
For maximum holding power, a hardwood dowel glued into an over-drilled hole provides the strongest base for a new screw. In side-grain applications, a 3/8″ dowel of the same species (oak into oak, maple into maple) glued with Titebond III produces a bond that is stronger than the surrounding wood — the failure point under load will be the wood grain adjacent to the repair, not the repair itself. This method is the gold standard for hinge screw repairs in hardwood doors and furniture.
Screw Hole Repair Methods Used by Furniture Restorers
Dowel + Glue (38%)
Two-Part Epoxy (26%)
Toothpick + Glue (18%)
Threaded Inserts (11%)
Wood Filler Only (7%)
Fig. 1: Distribution of screw hole repair methods used by professional furniture restorers, based on survey of 200 workshop professionals (2024 Woodworking Network data).
How to Reinforce with Concealed Screw Pockets
Pocket-hole joinery (Kreg-style) creates angled screw connections that are hidden from the visible surface. In furniture restoration, pocket holes allow you to relocate a screw connection away from damaged wood and into fresh material — without any visible evidence on the finished face. The pocket-hole jig constrains the drill angle to 15°, and the self-tapping pocket-hole screw (square drive, washer head) draws the joint tight with high clamping pressure.
This technique is particularly useful for face frame reattachment, corner block replacement, and tabletop fastening where the original screw locations have been destroyed by repeated disassembly.
Matching Grain Pattern and Color with Fillers and Stains
The final visual quality of a screw-site repair depends on how well the filler or dowel matches the surrounding wood. For dowel repairs, always use a dowel of the same species — oak dowels in oak furniture, walnut dowels in walnut. Grain direction in the dowel should parallel the surface grain of the surrounding wood for the most invisible result. After the glue cures and the dowel is sanded flush, apply stain in thin layers, building up color gradually until it matches. Test the stain on the sanding dust from the piece itself — this dust, mixed with wood glue, also makes an excellent custom filler for hairline cracks adjacent to the repair.
Replacing Hardware While Maintaining Integrity of Surrounding Wood
Backups for Re-Tapping Threads Without Deep Damage
When a screw hole is only slightly enlarged — the screw still catches but does not hold firm — the least invasive fix is to use a screw one gauge larger (#10 instead of #8, for example). The next-size screw’s threads cut into fresh wood at the periphery of the existing hole without requiring any filling. This only works if the hardware’s screw hole can accommodate the larger head — most hinges and brackets have enough clearance for a one-gauge increase.
If the hardware screw hole is too tight for a larger gauge, threaded inserts (screw-in, press-in, or E-Z LOK style) provide machine-thread reliability in wood. A 1/4″-20 threaded insert installed in a 3/8″ hole provides indefinite re-assembly capability — the insert threads permanently into the wood, and a machine screw threads into the insert. This approach is standard for furniture legs, bed rail hardware, and any joint that must be assembled and disassembled repeatedly.
Preloading and Seating to Avoid Overtightening
Overtightening is the most common cause of stripped screw holes in furniture. The instinct to “give it one more turn” crushes wood fibers beneath the screw head and stretches the screw-to-wood thread engagement past its elastic limit. The result is a screw that feels tight for a week, then loosens permanently as the crushed fibers relax.
The correct technique is to drive the screw until the head seats firmly against the wood surface (or the hardware), then stop. A clutched drill/driver set to the correct torque value enforces this automatically — the clutch slips when the set torque is reached, preventing the bit from turning further. For brass screws in hardwood, a torque setting of 1.5–2.5 Nm is typical for #6 and #8 gauges. Prince Fastener’s comprehensive guide to wood screws includes torque recommendations by screw gauge, material, and wood species for builders who want precise control.
Mounting Hardware with Even Pressure and Alignment Checks
When mounting a hinge, latch, or bracket with multiple screws, install all screws finger-tight first, then tighten each in a cross-pattern (as you would lug nuts on a wheel). This distributes clamping pressure evenly and prevents the hardware from shifting under the torque of the first screw. For cabinet hinges, use a self-centering bit (Vix bit) for pilot holes — the spring-loaded guide centers itself in the hinge screw hole and produces a perfectly aligned pilot every time.
Cleaning, Surface Prep, and Glue Management Before Reassembly
Removing Old Residues Without Abrading Veneer
Old glue, wax, and finish residue in and around screw holes must be removed before any adhesive will bond properly. For PVA (white/yellow wood glue) residue, a damp cloth and 10 minutes of soaking softens the glue enough to scrape with a plastic putty knife. For hide glue (common in antiques), warm water and patience — hide glue dissolves completely in water, which is one of its great advantages for restoration. For epoxy residue, heat (a heat gun on low, held 6″ from the surface for 20 seconds) softens the bond enough for mechanical removal.
On veneered surfaces, use only non-abrasive tools — plastic scrapers, nylon brushes, and cotton swabs. A single swipe with a metal scraper can cut through thin veneer (0.6 mm on most production furniture) and expose the substrate underneath, creating a repair that is more expensive and visible than the original damage.
Proper Glue Choice and Application Techniques
Titebond III (waterproof PVA) is the default for most furniture screw-hole repairs. It has a 10-minute open time (enough to position a dowel and align the joint), reaches clamp strength in 30 minutes, and is fully cured in 24 hours. For antique furniture where reversibility is a priority, hide glue (liquid or hot-pot) allows future disassembly without damage — a professional restoration standard.
Two-part epoxy is the choice when the repair involves dissimilar materials (metal inserts in wood), when the surfaces are contaminated and cannot be fully cleaned, or when the gap between mating surfaces exceeds 0.5 mm (where PVA starves and fails). Epoxy is not sandable to a feathered edge and does not accept stain, so confine it to concealed joints.
Finishing Prep to Ensure Adhesives Bond Well
Glue does not bond to finish. Any surface that will receive adhesive must be sanded to bare wood — 120-grit is sufficient to create mechanical tooth for PVA. For dowel-in-hole repairs, lightly sand the dowel and the inside of the hole with a rolled-up piece of 120-grit sandpaper before applying glue. Apply a thin, even layer to both the dowel and the hole walls — double-gluing (applying to both surfaces) increases bond strength by 15–20% compared to gluing only one surface, according to Franklin International (Titebond manufacturer) technical data.
Finishing Touches: Sanding, Staining, and Protecting the Restored Area

Sanding Sequence to Blend Repairs with Existing Wood
Sand the repaired area in three grits: 120 (to level the filler or dowel flush with the surrounding surface), 180 (to blend the transition zone), and 220 (to match the surface texture of the original finish). Always sand with the grain — cross-grain scratches are amplified by stain and become permanently visible. Feather the sanding area at least 2″ beyond the repair boundary so there is no hard line between repaired and original surfaces.
For veneered furniture, sand with extreme caution. Veneer is typically 0.6 mm thick on production pieces and 1.5–3 mm on vintage and artisan furniture. Two aggressive passes with 120-grit can sand through thin veneer entirely. Use 220-grit as the starting grit on veneer, with a sanding block (never freehand) to maintain a flat surface.
Color Matching and Protective Coatings for Durability
Apply stain to the repair area only — do not sand and restain the entire surface unless a full refinish is the objective. Use a small artist’s brush to apply stain precisely within the repair zone, building color in thin layers. A gel stain (Minwax Gel Stain, General Finishes Gel Stain) sits on the surface rather than penetrating, making it easier to control color intensity and blend edges.
After the stain dries (24 hours minimum), seal the repair with the same finish type as the rest of the piece — lacquer over lacquer, polyurethane over polyurethane, oil over oil. Mixing finish types (polyurethane over lacquer, for example) produces adhesion failures, flaking, and visible haze. If you cannot identify the original finish, test in an inconspicuous area: lacquer dissolves with lacquer thinner, shellac dissolves with denatured alcohol, and neither solvent affects polyurethane.
Long-Term Protection Against Moisture and Wear
In high-humidity environments (kitchens, bathrooms, basements), apply a thin coat of paste wax over the finished repair for an additional moisture barrier. For pieces in regular use (dining chairs, desks, cabinet doors), inspect screw tightness every 6–12 months and snug any screws that have backed out slightly — catching a loosening screw early prevents the cascading damage that turns a 5-minute adjustment into a 5-hour repair.
Recommended Sanding Sequence by Step
0
80
160
240
120
180
220
Step 1: Level
Step 2: Blend
Step 3: Match
Grit Number
Fig. 2: Three-step sanding sequence for furniture screw repairs. Higher grit numbers produce finer surfaces. Stop at 220 — finer grits reduce stain absorption.
Preventive Measures to Extend Screw Life in Wooden Furniture
Regular Maintenance Routines and Inspection Tips
Schedule a 15-minute hardware inspection every 6 months for furniture in daily use (dining chairs, desks, bed frames) and annually for storage or display furniture. Check each screw connection by gently attempting to rock the joint — any perceptible movement indicates a loose screw. Retighten by hand with a screwdriver (not a power driver) to avoid over-torquing. Document which screws needed attention; a screw that loosens repeatedly in the same location signals a stripped hole that needs structural repair, not just re-tightening.
Storage and Handling of Hardware to Prevent Corrosion
During furniture disassembly (for moving, refinishing, or repair), store all screws and hardware in labeled zip-lock bags with a small silica gel packet. Mark each bag with the screw location (e.g., “left door hinge, top screw”) and tape it to the corresponding furniture component. This prevents the corrosion and cross-contamination that occurs when screws sit in a jar of mixed hardware in a damp garage for six months.
For long-term hardware storage, apply a thin film of Renaissance Wax or paste wax to brass and steel screws. The wax provides a moisture barrier without altering the screw’s dimensions or affecting future adhesive bonds. Store in a climate-controlled environment — garage and basement humidity levels (often 60–80% RH) accelerate corrosion on carbon steel screws and tarnish brass.
Best Practices for Reassembly to Minimize Future Damage
Every reassembly should follow the same sequence: clean the screw hole, verify pilot hole diameter, apply wax to the screw threads (for lubrication, not sealing), insert the screw by hand for the first two turns (to verify thread engagement), then drive to final torque with a clutched driver. If the screw does not catch within the first two hand turns, stop — forcing it will cross-thread the hole and create a worse problem than the one you are solving.
For brass screws in hardwood, always pre-thread the hole with a steel screw of the same gauge before installing the brass fastener. Steel is three to four times harder than brass; the steel screw cuts clean threads that the brass screw then follows without shearing. This technique — standard practice among professional cabinet makers for generations — eliminates the most common mode of brass screw failure: head snapping under torque in dense wood. Prince Fastener’s comparison of brass and stainless steel screws provides additional detail on the mechanical limits of each material.
Watch: How to Repair a Stripped Screw Hole (Ask This Old House)
This video demonstrates the dowel-plug method for repairing stripped hinge screw holes in a hardwood door — the same technique used in furniture restoration for maximum holding strength.
Restoring furniture screws without damaging wood is a sequence of disciplined decisions, not a single dramatic fix. It starts with honest assessment — identifying the actual condition of the screw, the hole, and the surrounding wood before selecting any tool. It continues with correct tool selection: brad-point bits instead of twist bits, clutched drivers instead of impact drivers, brass or stainless screws instead of reactive carbon steel. And it ends with patient execution: properly sized pilot holes, controlled torque, and finishes that blend seamlessly into the surrounding surface.
Planning and patience are the two qualities that separate a repair that lasts 50 years from one that fails in 5 months. A professional restorer spends more time inspecting and planning than they do drilling and driving — and the result is furniture that functions and looks exactly as it did before the damage occurred.
If you are new to furniture screw repair, practice every technique described in this guide on scrap pieces of the same species before working on valuable furniture. A $3 piece of red oak from the hardware store is an excellent training ground for pilot hole drilling, dowel plugging, stain matching, and screw installation. The first five pilot holes you drill will teach you more about grain behavior and bit control than any article can convey — and the mistakes will cost nothing.
For sourcing quality brass, stainless steel, and custom wood screws that match the specific requirements of your restoration project, prendedor de príncipe offers a comprehensive product range with over 30 years of fastener manufacturing experience. Their wood screw product catalog includes the gauges, materials, and head types covered throughout this guide.
Frequently Asked Questions (FAQs)
1. What are the most versatile tools for repairing screws in wood?
A clutched cordless drill/driver, a set of brad-point drill bits (1/16″ to 1/4″), a screw extractor set, and a sharp manual screwdriver cover approximately 90% of furniture screw repair tasks. The brad-point bits produce clean pilot holes in hardwood without wander, the extractor set handles stripped fasteners, and the clutched drill prevents over-torquing. Add a set of Forstner bits for dowel-plug repairs and a countersink bit for flush-head installations, and you have a complete furniture screw repair toolkit for under $200.
2. How can I tell if a pilot hole is too large for the screw I chose?
Insert the screw into the pilot hole by hand, without turning it. If the screw drops in under its own weight without any thread engagement, the hole is too large — the threads cannot grip the surrounding wood fibers. The correct pilot hole allows the screw to start threading within the first half-turn of hand pressure but requires a screwdriver to drive it to full depth. If the screw slides in freely, fill the hole with a glued dowel, let it cure 24 hours, and re-drill to the correct diameter using the pilot hole sizing chart for your screw gauge and wood species.
3. Can I fix stripped screws without removing the surrounding wood veneer?
Yes, in most cases. The rubber band and steel shim techniques extract stripped screws through the existing head recess without touching the surrounding surface. For hole repair, inject two-part epoxy through the screw hole using a syringe — the epoxy fills the damaged cavity beneath the veneer without disturbing the surface. After cure, re-drill a pilot hole through the epoxy and install a new screw. This approach is less disruptive than the dowel-plug method, which requires boring a larger hole that may extend beyond the screw site and into the veneer field.
4. What finishes work best after a screw repair to maintain color and protection?
Match the existing finish type. Lacquer over lacquer, polyurethane over polyurethane, oil over oil. For stain matching, gel stains (General Finishes, Minwax) offer the most control because they sit on the surface and build color gradually. After staining, seal with the same clear coat as the original piece. If the original finish is unknown, test with lacquer thinner (dissolves lacquer), denatured alcohol (dissolves shellac), and mineral spirits (softens oil finishes) in an inconspicuous area to identify the type before applying any topcoat.
5. Should I use wood glue or epoxy when gluing dowels into stripped screw holes?
Use wood glue (Titebond III) for standard indoor furniture repairs — it creates a bond stronger than the wood itself, has a convenient working time of 10 minutes, and any squeeze-out cleans up with a damp cloth before it sets. Use two-part epoxy when the joint will be exposed to moisture, when the surfaces cannot be cleaned to bare wood, or when the gap between the dowel and the hole wall exceeds 0.5 mm. Epoxy is stronger in gap-filling applications; wood glue is stronger in tight-fitting joints.
6. How do I prevent brass screws from snapping when driving into hardwood?
Always pre-thread the hole with a steel screw of the same gauge first. The steel screw cuts clean threads into the dense hardwood, and the brass screw follows the pre-cut threads without resistance. Apply paste wax to the brass screw threads for additional lubrication. Drive at the lowest effective speed (200–300 RPM) and stop the instant the head seats. Brass has roughly one-third the tensile strength of steel — any additional torque past seating risks shearing the head off the shank.
7. How often should I inspect and tighten furniture screws?
For furniture in daily use (dining chairs, desks, beds), inspect every 6 months. For display or storage furniture, annually is sufficient. Focus on hinge screws, leg attachment points, and any joint that bears cyclic or dynamic loads. A screw that loosens repeatedly in the same location has a stripped hole that needs structural repair — retightening alone will not solve it.
8. Can I use a threaded insert instead of repairing a stripped screw hole with a dowel?
Yes — threaded inserts are an excellent solution for furniture joints that must be disassembled and reassembled repeatedly (bed frames, knock-down tables, modular shelving). A 1/4″-20 screw-in insert installed in a properly sized hole provides indefinite reusability with machine-thread precision. The dowel method is preferred when the original screw type must be preserved (antique restoration) or when the surrounding wood damage extends beyond what the insert’s outer diameter can span.
9. What is the safest way to remove a corroded screw from antique furniture?
Apply penetrating oil (PB Blaster, Kroil) to the screw head and allow 30–60 minutes of soak time. Then heat the screw head with a soldering iron tip (not a heat gun — the diffuse heat from a heat gun can blister finishes 6″ from the target). The heat expands the screw, breaking the corrosion bond. After cooling, attempt extraction with a properly fitting screwdriver. If the head is too corroded for driver engagement, use a left-hand drill bit to bore into the head — the counterclockwise cutting action often loosens the screw during drilling.
10. Where can I source high-quality brass and stainless steel screws for furniture restoration?
prendedor de príncipe manufactures brass screws, stainless steel 304/316 screws, and carbon steel screws in all standard furniture gauges (#2 through #14), head types (flat, oval, round, pan), and drive styles (slotted, Phillips, square, Torx). Their custom fastener program can produce non-standard lengths, specialty finishes, and period-accurate slotted-head brass screws for antique restoration projects. For specialty vintage hardware screws (hand-cut threads, tapered shanks), Kennedy Hardware and Horton Brasses are additional sources.