You want your floors to last a long time. You want them to stay quiet. You want them to feel safe. If you do not follow the best ways to install, you can make mistakes. These mistakes can cause loose panels. They can make squeaks. They can even cause moisture problems. Using the right screws for subfloor installation helps you avoid these mistakes. It keeps your subfloor strong for many years.
Основные выводы
- Выберите right screws for your subfloor. Look for screws with coarse threads and a bugle or flat head to ensure a strong grip and flush fit.
- Используйте correct screw length. Most builders recommend 2 to 3-inch screws for plywood or OSB panels to avoid loose or damaged flooring.
- Follow proper screw placement guidelines. Space screws no more than 6 inches apart at the ends and 12 inches in the middle to prevent movement and squeaks.
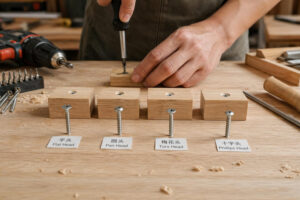
Wrong Screws for Subfloor
Choosing the Right Screws
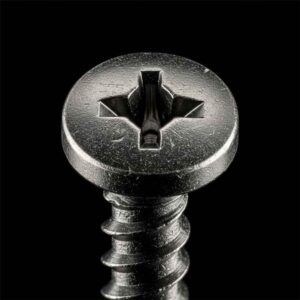
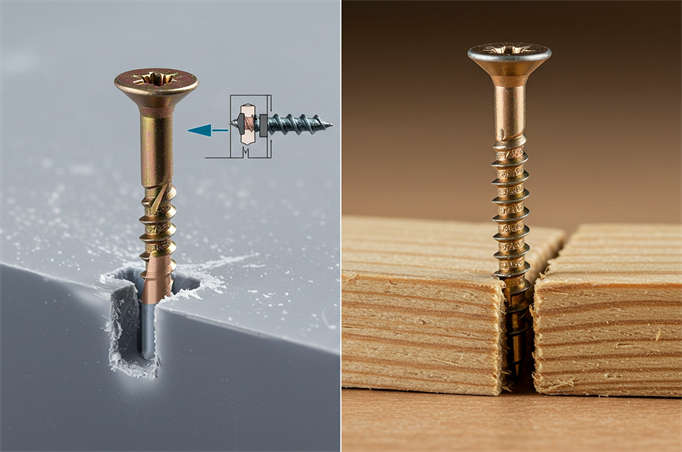
You might think any screw will work for your subfloor, but that is a common mistake. Not all screws for subfloor are the same. If you pick the wrong type, you risk weak floors, squeaks, or even safety problems. Brands like Prince Fastener make screws for subfloor that are strong and reliable. You want to look for screws with coarse, deep threads and a bugle or flat head. These features help the screw grip the wood and sit flush with the panel.
Here is a quick table to help you compare the most common screws for subfloor:
| Тип винта | Свойства |
|---|---|
| Шурупы по дереву | Prevent wood splitting, deep threads for grip. |
| Coated and Galvanized | Resist corrosion, great for moist areas, last longer. |
| Палубные винты | Strong, sharp, work with many wood types. |
| Строительные винты | Very strong, flat heads, made from hardened steel. |
You should also check the drive type. Square drives give you good torque, and Torx drives help prevent slipping. Most builders use #8 or #9 screws for subfloor because they balance strength and ease of use.
Drywall screws are designed for fastening drywall and soft materials, not for heavy loads. Using them in subfloor installations can lead to structural failure and safety hazards due to their tendency to snap or rust.
Avoiding Inadequate Fastening
If you use the wrong screws for subfloor, you risk incorrect fastening. This can cause panels to move or squeak. Always follow the manufacturer’s recommendations. Use screws for subfloor with sharp points and protective coatings, especially in damp areas. Skipping these steps is a sign of inadequate prep work and can lead to bigger problems later. When you choose the right screws for subfloor, you help your subfloor stay strong and quiet for years.
Incorrect Screw Length
Risks of Short or Long Screws
You might think any screw length will work for your subfloor, but that is not true. Using screws that are too short can cause the panels to pull loose over time. If you use screws that are too long, you risk poking through the joists or damaging wires and pipes below. Both of these mistakes can lead to squeaky floors, weak spots, or even safety problems. You want your subfloor to feel solid every time you walk across it.
Here are some common problems you might face with the wrong screw length:
- Short screws may not reach deep enough into the joist, so the panel can shift or lift.
- Long screws can stick out the bottom of the joist, which can be dangerous if there are wires or plumbing underneath.
- Using the wrong length can make your floor noisy or unstable.
Selecting Proper Length
Picking the right screw length is easier than you think. Most builders recommend screws that are 2 to 3 inches long for securing plywood or OSB subfloor panels to joists. This length gives you a strong hold without going too deep.
You can use these tips to help you choose the best screw length:
- If you are screwing directly into joists, 3-inch screws work well for most jobs.
- For thinner layers, like a 1/2-inch sheet over another layer, a shorter screw (such as 1-1/8 inch) is better.
- When you have multiple layers, you may need longer screws to reach the joist and hold everything tight.
- Always try to screw into the joists for a stronger, stiffer floor.
Choosing the right screw length helps you avoid common mistakes and keeps your subfloor strong for years.
Poor Screw Placement in Subfloor Installation
Fastener Spacing Issues
You might not think much about where you put screws, but improper spacing can cause big problems. If you place screws too far apart, your subfloor can move and squeak. This movement weakens the integrity of your floor and can lead to mistakes that are hard to fix later. Gaps and shifting panels often happen when you use improper nailing or miss the right spots.
Here’s what you should remember about fastener spacing:
- Place screws no more than 6 inches apart along the panel ends.
- In the middle of the panels, keep screws 12 inches apart.
- Keep screws at least 3/8 inch from the panel edges.
If you overdrive screws, you can crush the wood fibers. This weakens the integrity of the subfloor. Use a drill with an adjustable clutch to avoid this mistake. Also, using non-corrosion-resistant screws in damp areas can lead to rust and more problems.
Tip: Always check for improper nailing or improper spacing before moving to the next panel. This helps keep the structural integrity strong.
Following Manufacturer Guidelines
Manufacturers give you clear rules for screw placement. If you skip these steps, you risk losing the integrity of your floor. Here are some simple tips:
- Use screws that are at least 1.5 times the thickness of the board.
- Predrill holes if you’re working with thin plywood.
- Install screws every 12 inches along joists, or every 6 inches for a tighter fit.
- Leave a 1/8-inch gap between sheets and a 1/4-inch gap at the perimeter.
Following these guidelines helps you avoid improper nailing and keeps your subfloor solid for years.
Skipping Adhesive with Screws
Adhesive for Subfloor Stability
You might think screws alone will keep your subfloor strong, but that is not always true. If you skip adhesive, you miss out on extra strength and stability. Construction adhesive fills small gaps between the joist and the subfloor. This helps the two surfaces bond tightly. When you inject adhesive into the gap, you can cut down on squeaks and make your floor feel solid. If you have access from below, you can add adhesive to problem spots and boost the bond even more.
Tip: Always use adhesive along the joists before you lay down the panels. This step helps you avoid improper glue application and gives you a better result.
Minimizing Floor Movement
You want a floor that does not move or make noise. Using both adhesive and screws is the best way to get a stable subfloor. Here is why this combo works so well:
- Construction adhesive fills gaps and keeps the subfloor from shifting.
- Screws clamp the panels down and hold everything tight.
- The bond from the adhesive stops movement, which means fewer squeaks.
- When you use both, you get a floor that feels solid and quiet.
If you only use screws, you might still hear creaks or feel movement. The adhesive acts like a cushion and keeps everything in place. This method works best for new builds and repairs. You get a floor that lasts longer and stays quiet.
Not Allowing Subfloor to Dry
Moisture Problems
Not letting a subfloor dry can cause big trouble for your floors. When you install panels over a wet or damp surface, you invite moisture problems that can ruin your hard work. You might see boards start to cup, where the edges curl up and make the floor uneven. Sometimes, you try to fix this by sanding, but that can lead to crowning, which leaves low spots and permanent damage. Too much moisture can also push boards together so tightly that they never return to normal, even after drying.
You may notice these warning signs:
- Spongy or soft spots when you walk
- Gaps that come and go with the seasons
- Creaking or popping sounds
- Mold or mildew growing on the surface
- Musty smells that do not go away
- Paint or finish peeling near the edges
If you cover a wet subfloor, moisture can move into your flooring. This can break the adhesive bond and cause swelling, cracking, or warping. You need good moisture protection to keep your floors safe and strong.
Checking Subfloor Before Installation
You want to avoid moisture issues before they start. Always check the subfloor for moisture before you install anything. Here’s how you can do it:
- Pick the right meter for your subfloor type. Use a Tramex Concrete Moisture Encounter for concrete or a Tramex wood meter for wood.
- Test in several spots and make a moisture map. This helps you see if some areas are wetter than others.
- Compare your readings to what your flooring manufacturer says is safe.
| Subfloor Type | Acceptable Moisture Content Levels |
|---|---|
| Конкретный | ≤ 75% RH (ASTM F2170) and ≤ 3 lbs / 1000 sq ft / 24 hr (ASTM F1869) |
| Древесина | ≤ 12% moisture content and ≤ 3% difference with flooring materials |
If you find high moisture, wait for the subfloor to dry or use a moisture barrier. Not acclimatizing the subfloor or skipping moisture protection can lead to costly repairs later. Take your time and check carefully. Your floors will thank you!
Failing to Leave Expansion Gaps
Expansion and Contraction Issues
You might not realize it, but your floors move with the seasons. Wood and laminate flooring expand when it gets humid and shrink when it gets dry. If you do not leave enough space for this movement, you can run into big problems. The expansion gap—usually about ¼ inch to ½ inch wide—lets your floor breathe and shift without damage. For most rooms, a ¼ inch gap works well. In bigger spaces, you might need up to ½ inch.
What happens if you skip these gaps? Here’s what you might see:
- Floors buckle or lift because the planks push against each other and the walls.
- Gaps and separations form as the floor tries to move but has nowhere to go.
- You hear creaking or popping sounds with every step.
- The edges of your planks chip, crack, or even curl up.
Tip: Always check the manufacturer’s instructions for the right gap size. This small detail can save you a lot of trouble later.
Preventing Gaps and Buckling
You can keep your floors looking great by following a few simple steps. First, always leave the right expansion gap around the edges of your subfloor. Use spacers during installation to make this easy. Keep your home’s humidity between 30% and 50% and try to avoid big temperature swings. A quality underlayment helps protect against moisture and adds stability. Clean your floors with a damp mop, not a wet one, to prevent warping. Check your floors now and then for signs of movement or gaps. If you notice problems that do not go away, call a professional for help.
By paying attention to these details, you can avoid buckling, warping, and noisy floors. Your subfloor will stay strong and your finished floor will last for years.
Incomplete Fastening of Panels
Ensuring Full Panel Adhesion
If you do not fasten every panel completely, you risk loose spots and future problems. Each panel needs to stick tight to the joists and the panels next to it. This helps your floor feel solid and last longer. You can follow these steps to make sure you get full adhesion:
- Tap each sheet lightly into place and leave a 1/8-inch gap on all sides.
- Stand on the panel while fastening to press it down for better contact.
- Используйте quality adhesive on the joists before setting the panel.
- Fasten the edges every 2 inches, starting from the corner of the room.
- Countersink screws just below the surface for a smooth finish.
- Finish fastening one sheet before moving to the next row.
Tip: Using a stand-up cordless auto-feed screw system can save your back and help you fasten panels quickly and evenly.
Preventing Squeaks and Movement
Loose panels can cause squeaks, bouncy spots, and even damage over time. You want your subfloor to stay quiet and strong. Here are some ways to prevent noise and movement:
- Walk on the panels after fastening to check for squeaks.
- Add extra screws if you hear any noise.
- Use glue and screws together for the best hold.
- Install blocking between joists to stop bounce.
- Clean up spills right away to keep moisture out.
When you take your time and fasten every panel well, you get a floor that feels sturdy and stays quiet for years.
You can stop squeaks and warping if you use these tips. Careful work on your subfloor helps your floor last longer. Your floor will feel strong and safe.
- Stop damage and buckling
- Make your floor safer and tougher
- Get floors that are quiet and strong
If you pay attention now, your floor will stay good for years.
Часто задаваемые вопросы
What type of screw should I use for my subfloor?
You should use coated or galvanized screws made for subfloors. These resist rust and hold panels tight. Avoid drywall screws.
How far apart should I space screws in my subfloor?
Place screws every 6 inches along panel edges and every 12 inches in the middle. This keeps your floor strong and quiet.
Can I use only screws without adhesive?
You can, but you might hear squeaks later. Using both adhesive and screws gives you a stronger, quieter floor.