To measure wood screw dimensions accurately, you need three measurements: length (from the tip of the screw to the point where the head sits flush with the surface), diameter or gauge (measured across the widest part of the threads using calipers), and thread pitch (the number of threads per inch, counted with a ruler or thread pitch gauge). These three numbers define the screw’s size and determine whether it will fit your pilot hole, your material thickness, and your project requirements.
Getting these measurements right matters more than most people realize. A screw that is too short will not grip enough wood to hold the joint securely. A screw that is too thick will split the workpiece. A mismatched thread pitch will result in a loose fit or a stripped hole. Whether you are building furniture, framing a wall, or attaching hardware, knowing the exact length, diameter, and thread pitch of your wood screw is the difference between a joint that holds for decades and one that fails under its first real load.
The screw head type also affects how you measure length — flat head (countersunk) screws are measured differently from round head and pan head screws. This guide walks you through every step, tool, and size chart you need to measure wood screw dimensions with confidence. If you are sourcing screws for a project, manufacturers like prendedor de príncipe provide detailed dimensional specifications for every product in their catalog, which makes cross-referencing your measurements straightforward.
Let’s start with length — the measurement that causes the most confusion.
Measuring Wood Screw Length
Ferramentas para medir comprimentos
You only need a few simple tools to measure wood screw length accurately. A standard steel ruler (graduated in inches and millimeters) is sufficient for most measurements. For greater precision — especially on small screws — digital calipers are the best tool, capable of measuring to 0.01 mm or 0.001 inches. A tape measure works in a pinch but is less precise than a ruler for small fasteners. Place the screw on a flat, well-lit surface before measuring to avoid parallax errors. If you are measuring multiple screws to verify consistency (a good practice when receiving a bulk order), a go/no-go screw gauge can speed up the process significantly.
Step-by-Step: Measure Wood Screw Size
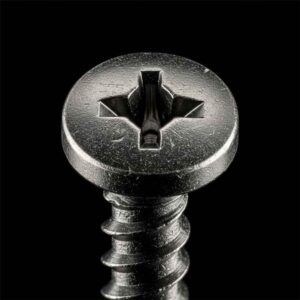
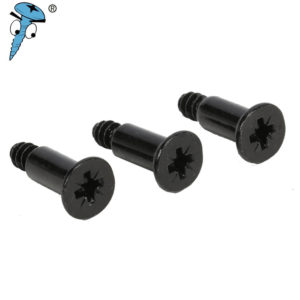
The correct method for measuring wood screw length depends on the head style. The universal rule is: measure from the tip of the screw to the point where the head sits flush with the wood surface after installation. For flat head (countersunk) screws, the head sinks into the wood, so you measure the entire length from tip to the top of the head. For round head, pan head, truss head, and hex head screws, the head sits on top of the surface, so you measure from the tip to the underside of the head (excluding the head itself). This distinction is critical — if you include the head on a round head screw, your measurement will be too long, and the screw will not seat properly in your joint.
To perform the measurement, lay the screw flat on a surface. Align the zero mark of your ruler or caliper with the sharp tip. Read the measurement at the appropriate point — top of head for countersunk, bottom of head for non-countersunk. Record the length in inches (for imperial screws) or millimeters (for metric screws). Prince Fastener’s screw measurement guide includes visual diagrams showing exactly where to start and stop the measurement for each head type.
Incluindo o chefe ou não
This single point of confusion causes more measurement errors than any other factor. Here is the definitive rule in table form:
| estilo de cabeça | Sits Flush / Below Surface? | Include Head in Length? | Measure From → To |
|---|---|---|---|
| Flat Head (Countersunk) | Yes — sinks flush | Sim | Tip → Top of head |
| Oval Head (Raised Countersunk) | Partially — dome protrudes | Partially (to flat portion) | Tip → Where head meets surface |
| Cabeça redonda | No — sits on top | No | Tip → Underside of head |
| Ponta do pão | No — sits on top | No | Tip → Underside of head |
| Cabeça de treliça | No — sits on top | No | Tip → Underside of head |
| Hex Head / Hex Washer | No — sits on top | No | Tip → Underside of head |
Remember: the length of a wood screw describes how deep it penetrates into the material, not the total physical length of the fastener. This is why countersunk heads are included (they go below the surface) and non-countersunk heads are excluded (they stay above it).
Common Mistakes
The most frequent measurement mistakes for wood screw length include measuring from the wrong reference point on the head (especially on oval head screws), forgetting to account for the head on countersunk screws, measuring a curved screw without straightening the measurement line, and confusing imperial and metric units during conversion. Another common error is measuring the threaded portion only and ignoring the unthreaded shank. Many wood screws have a smooth shank below the head and threads only on the lower portion — the length measurement always includes both the threaded and unthreaded sections. Double-check every measurement before ordering, and when in doubt, consult a wood screw size chart to verify your numbers.
Measuring Wood Screw Dimensions: Diameter & Gauge

Using Calipers or Screw Gauge
The diameter (or gauge) of a wood screw is its second most important dimension. To measure it, you need calipers — either digital or dial. Digital calipers are preferred because they display the measurement directly in both inches and millimeters, eliminating conversion errors. To measure, open the caliper jaws, place the screw’s threaded section between them, and close the jaws until they contact the outermost edges of the threads on opposite sides. The reading you get is the major diameter — the widest point across the screw’s threads. This is the measurement that corresponds to the screw’s gauge number or metric size designation.
If you do not have calipers, you can use a screw gauge card (a flat card or metal plate with pre-drilled holes of known sizes). Simply insert the screw into the holes until you find the one that fits snugly — that hole’s label tells you the gauge. Screw gauge cards are inexpensive and available from most hardware stores and fastener suppliers. Prince Fastener’s screw diameter chart can also help you cross-reference a caliper measurement to the correct gauge number.
Understanding Gauge Numbers
In the imperial system, wood screw diameters are designated by gauge numbers rather than fractional or decimal inches. The gauge system ranges from #0 (the smallest common size, at 0.060″ diameter) up to #24 (0.372″ diameter), although sizes above #14 are rarely used in woodworking. The gauge number is not intuitive — it does not directly correspond to any easily recognizable unit. However, there is a simple conversion formula: Diameter (inches) = (Gauge × 0.013) + 0.060. For example, a #8 screw has a major diameter of (8 × 0.013) + 0.060 = 0.164 inches, or approximately 4.17 mm.
The full gauge-to-diameter conversion table is shown below:
Wood Screw Gauge to Diameter Conversion Chart
| Gauge # | Major Diameter (inches) | Diâmetro principal (mm) | Nearest Metric Equivalent | Uso típico |
|---|---|---|---|---|
| #2 | 0.086″ | 2.18 mm | M2 | Jewelry boxes, small hinges |
| #4 | 0.112″ | 2.84 mm | M3 | Small hardware, trim |
| #6 | 0.138″ | 3,51 mm | M3.5 | Cabinets, light woodwork |
| #8 | 0.164″ | 4,17 mm | M4 | General carpentry, furniture |
| #10 | 0.190″ | 4,83 mm | M5 | Decking, framing, heavy furniture |
| #12 | 0.216″ | 5,49 mm | M5.5 | Structural, heavy loads |
| #14 | 0.242″ | 6.15 mm | M6 | Heavy-duty structural, lag applications |
In the metric system, wood screws are sized by their actual diameter in millimeters (e.g., 3.5 mm, 4.0 mm, 5.0 mm), which is simpler and eliminates the need for a conversion formula. If you work internationally, the metric system is generally easier to use.
Step-by-Step: Measuring Wood Screw Size
Here is the complete process for identifying a wood screw’s diameter: First, pick up the screw and place it between the jaws of your calipers, positioned across the widest part of the threads. Close the jaws until they make full contact. Read the measurement — if it reads approximately 0.164″, you have a #8 gauge screw. Second, verify by checking the table above or by using the formula. Third, if the measurement falls between standard sizes (e.g., 0.150″), check whether the screw’s threads are worn or damaged, as this can reduce the measured diameter. A new, undamaged screw should fall within ±0.003″ of the nominal diameter listed in the chart.
Dicas práticas
When measuring diameter, always measure across the threads (not the smooth shank area), as the major thread diameter is the defining dimension. Take measurements at two or three points along the threaded length and average them for the most accurate result. If you are sorting a mixed collection of unknown screws, organize them by diameter first, then by length — this is the fastest way to identify and group them. For projects that require precise fits, such as fine woodworking or cabinetry, always use calipers rather than visual estimation or screw gauge cards, since gauge cards may have manufacturing tolerances of their own.
Most Popular Wood Screw Gauges by Usage Frequency
#8 and #10 gauge screws together account for approximately 60% of all wood screw usage in residential and commercial construction. If you are stocking a shop or job trailer, start with these two sizes in multiple lengths.
Measuring Thread Pitch

What Is Thread Pitch
Thread pitch is the distance between adjacent thread crests — essentially, how tightly the threads are spaced along the screw’s shaft. In the imperial system, thread pitch is expressed as Roscas por polegada (TPI): the number of complete thread peaks within one linear inch. A higher TPI number means finer, more closely spaced threads; a lower TPI means coarser, more widely spaced threads. In the metric system, pitch is expressed directly as the distance in millimeters between threads (e.g., a 1.25 mm pitch means each thread crest is 1.25 mm from the next).
Wood screws typically have coarse threads compared to machine screws because coarse threads grip wood fibers more aggressively and provide stronger pullout resistance in soft materials. The thread pitch of a wood screw is not usually specified when purchasing (it is standardized for each gauge size), but it becomes important when you need to match a replacement screw to an existing hole, when you are working with exotic or very dense hardwoods that respond better to finer threads, or when comparing wood screws versus metal screws for a particular application.
How to Measure Thread Pitch
There are two reliable methods for measuring thread pitch. The first and most accurate is using a thread pitch gauge (also called a screw pitch gauge) — a set of thin metal blades, each with a different tooth pattern. You press each blade against the screw’s threads until you find the one that meshes perfectly. The blade’s label tells you the TPI or metric pitch. Thread pitch gauges are inexpensive (under $10) and available at any hardware store or from fastener suppliers.
The second method uses a ruler. Place the ruler alongside the threaded portion of the screw so that the edge of the ruler aligns with the thread crests. Count the number of thread peaks within a one-inch span. That count is your TPI. For greater accuracy on short screws, count over a half-inch span and multiply by two. For metric screws, measure the distance between two adjacent thread crests in millimeters — that measurement is the pitch. If the pitch falls between 1 mm and 2 mm, double-check with a caliper for precision.
When Thread Pitch Matters
Thread pitch becomes a critical factor in several scenarios. When replacing a single screw in a pre-existing assembly, the replacement must have the same pitch to thread into the existing hole without stripping it. When fastening into very hard woods (like teak, ipe, or white oak), a screw with finer threads and a higher TPI may reduce splitting risk and provide smoother driving. When comparing screws from different manufacturers, two screws may share the same gauge and length but have different thread pitches, resulting in different holding power and driving characteristics. For specialized projects, Prince Fastener’s wood screw selection guide helps you match the right screw design — including thread profile — to your specific wood type and application.
Wood Screw Size Chart & Sizing Systems

Imperial vs Metric
The world uses two main sizing systems for wood screws, and understanding both is essential if you source materials internationally or work on projects with mixed specifications. The imperial system (used predominantly in the United States and Canada) designates wood screws by gauge number and length in inches — for example, “#8 × 1-1/2 inch” means a #8 gauge screw that is 1.5 inches long. The metric system (used in Europe, Asia, and most of the rest of the world) designates screws by diameter in millimeters and length in millimeters — for example, “4.0 × 40 mm” means a 4.0 mm diameter screw that is 40 mm long.
The conversion between the two systems is not always exact. A #8 screw (0.164″ / 4.17 mm) does not have a perfect metric equivalent — the closest is 4.0 mm, but they are not interchangeable without checking the pilot hole and countersink dimensions. The table below provides the most common conversions. When ordering from an international supplier like prendedor de príncipe, always confirm whether dimensions are in imperial or metric to avoid sizing errors.
Imperial to Metric Wood Screw Size Conversion Chart
| Imperial Gauge | Imperial Diameter | Metric Diameter (mm) | Common Imperial Lengths | Metric Length Equivalents |
|---|---|---|---|---|
| #4 | 0.112″ | 3.0 mm | 1/2″, 5/8″, 3/4″, 1″ | 12, 16, 20, 25 mm |
| #6 | 0.138″ | 3.5 mm | 1/2″, 3/4″, 1″, 1-1/4″, 1-1/2″ | 12, 20, 25, 30, 40 mm |
| #8 | 0.164″ | 4.0 mm | 3/4″, 1″, 1-1/4″, 1-1/2″, 2″ | 20, 25, 30, 40, 50 mm |
| #10 | 0.190″ | 5.0 mm | 1″, 1-1/2″, 2″, 2-1/2″, 3″ | 25, 40, 50, 60, 75 mm |
| #12 | 0.216″ | 5.5 mm | 1-1/2″, 2″, 2-1/2″, 3″ | 40, 50, 60, 75 mm |
| #14 | 0.242″ | 6.0 mm | 2″, 2-1/2″, 3″, 3-1/2″ | 50, 60, 75, 90 mm |
Using a Wood Screw Size Chart
A wood screw size chart is your single most valuable reference tool. A good chart shows the gauge number, the corresponding diameter in both inches and millimeters, the recommended pilot hole sizes for softwood and hardwood, the clearance hole size (the hole in the top piece of wood through which the shank passes freely), and the countersink diameter for flat head screws. Charts from authoritative sources like Bolt Depot e Prince Fastener’s screw comparison pages are reliable references. Print one out and keep it in your workshop — you will use it on every project.
When using a size chart, always check three things: first, confirm that the gauge and diameter match your caliper measurement. Second, look up the correct pilot hole drill bit size for your specific wood species (softwood pilot holes are smaller than hardwood pilot holes for the same screw gauge). Third, verify the countersink diameter if you are using flat head screws, so the head sits flush with the surface.
Recommended Pilot Hole and Clearance Hole Sizes
| Gauge # | Pilot Hole – Softwood | Pilot Hole – Hardwood | Clearance Hole | Countersink Diameter |
|---|---|---|---|---|
| #4 | 1/16″ | 5/64″ | 7/64″ | 1/4″ |
| #6 | 5/64″ | 3/32″ | 9/64″ | 5/16″ |
| #8 | 3/32″ | 7/64″ | 11/64″ | 3/8″ |
| #10 | 7/64″ | 1/8″ | 13/64″ | 7/16″ |
| #12 | 1/8″ | 9/64″ | 15/64″ | 1/2″ |
| #14 | 9/64″ | 5/32″ | 1/4″ | 9/16″ |
Reading Screw Packaging
Screw packaging labels follow a standard format, but the specifics vary by region. In the United States, a typical label reads: #8 × 1-1/2″ Flat Head Phillips Wood Screw, Zinc Plated. This tells you the gauge (#8), the length (1-1/2 inches), the head style (flat/countersunk), the drive type (Phillips), the screw category (wood screw), and the finish (zinc plated). Metric labels follow a similar pattern: 4.0 × 40 mm Countersunk Pozidrive Wood Screw, Stainless Steel A2. Some packages also include the thread type (coarse or fine), the material grade, and the applicable standard (e.g., DIN 7505 for parafusos de aglomerado).
Pay close attention to the material and finish listed on the packaging, as these affect both performance and compatibility. A zinc-plated steel screw should not be used in outdoor applications where a stainless steel or coated screw is required. If the packaging does not specify the material clearly, check the manufacturer’s data sheet or contact the supplier directly.
Wood Screw Sizing Systems Used Worldwide
The metric system dominates globally, but the imperial gauge system remains standard in North America. If you export products or work on international projects, familiarity with both systems is essential.
Video: Wood Screw Sizes Explained – A Beginner’s Guide
This excellent video from Training Hands Academy walks through every aspect of wood screw sizing — gauge numbers, lengths, thread types, and how to read packaging labels. Highly recommended for visual learners.
Conclusão

Measuring wood screw dimensions accurately requires three measurements: length, diameter (gauge), and thread pitch. For length, measure from the tip to the flush point — including the head on countersunk screws and excluding it on round, pan, and hex head screws. For diameter, use calipers to measure across the widest part of the threads and convert to gauge number using the standard chart. For thread pitch, count threads per inch with a ruler or thread pitch gauge.
Accuracy depends on using the right tools. Digital calipers, a steel ruler, and a thread pitch gauge together cost under $30 and will serve you for years. These are not optional accessories — they are essential measurement instruments that prevent costly mistakes in material selection and joint design. Always double-check your measurements, especially when ordering in bulk, and consult a size chart to verify that your numbers match a standard screw size.
When measurements are ambiguous or you are working with non-standard screws, bring a sample to your hardware store or contact a manufacturer like prendedor de príncipe who can identify the screw from a photo or physical sample. Their extensive product catalog covers every standard wood screw gauge, length, head style, material, and finish — along with the dimensional data you need to verify your measurements.
For further reading, explore Prince Fastener’s comprehensive wood screw guide, the Bolt Depot wood screw diameter chart, e Woodcraft’s guide to screw sizes.
Frequently Asked Questions (FAQ)
1. How do I measure wood screw length for a flat head screw?
For flat head (countersunk) wood screws, measure the total length from the sharp tip to the very top of the head. Because flat head screws sink flush into the wood surface, the head is part of the penetration depth and must be included in the length measurement. This is the opposite of round head or pan head screws, where the head sits above the surface and is excluded from the length.
2. What tool is best for measuring wood screw diameter?
Digital calipers are the best tool for measuring wood screw diameter. They measure to 0.01 mm or 0.001″ precision and display the reading directly, eliminating guesswork. Place the caliper jaws across the outermost edges of the threads (the major diameter) for an accurate gauge measurement. If you don’t have calipers, a screw gauge card with labeled holes can also identify the gauge. Prince Fastener’s measurement guide provides visual instructions for both methods.
3. What does the gauge number on a wood screw mean?
The gauge number indicates the screw’s major thread diameter using the imperial sizing system. Higher gauge numbers mean larger diameters. The formula to convert gauge to inches is: Diameter = (Gauge × 0.013) + 0.060. For example, a #8 gauge screw has a diameter of 0.164 inches (4.17 mm). Common wood screw gauges range from #2 (very thin) to #14 (very thick), with #8 and #10 being the most widely used sizes.
4. How do I convert imperial wood screw sizes to metric?
To convert an imperial gauge to metric, first calculate the decimal diameter using the formula above, then multiply by 25.4 to get millimeters. For example, #10 = 0.190″ × 25.4 = 4.83 mm. The nearest standard metric size is 5.0 mm. For length, simply multiply inches by 25.4 (e.g., 1.5″ = 38.1 mm, rounded to 40 mm in standard metric sizes). Use the imperial-to-metric conversion chart in this article for quick reference.
5. Do I need to measure thread pitch on wood screws?
For most standard woodworking projects, thread pitch does not need to be measured because it is standardized for each gauge size. However, thread pitch becomes important when replacing a screw in an existing hole (the new screw must match the old thread spacing), when comparing wood screws from different manufacturers, or when selecting screws for very hard or very soft woods where thread aggressiveness affects performance.
6. What is the difference between a wood screw and a drywall screw in terms of dimensions?
Wood screws and parafusos drywall differ in thread profile and shank design. Wood screws typically have a partially threaded shank (smooth near the head, threaded at the tip) with a tapered point, while drywall screws are threaded along the full length with a bugle head designed for plasterboard. Drywall screws are measured the same way as flat head wood screws — from tip to top of head — but their thread pitch is usually coarser for faster driving into soft material.
7. What happens if I use the wrong size wood screw?
Using a screw that is too thick can split the wood, especially near edges and in hardwoods. Using a screw that is too thin provides insufficient holding power and the joint may loosen over time. Using a screw that is too short means the threads do not engage enough wood to carry the load. Using a screw that is too long can poke through the opposite side of the workpiece or hit a hidden obstruction. Accurate measurement prevents all of these problems.
8. How do I measure a wood screw if it’s partially driven into wood?
If the screw is partially driven and cannot be removed, measure the exposed portion and estimate the embedded portion based on the visible thread pattern and the material thickness. If you can remove the screw safely, do so — then lay it on a flat surface and measure normally. For screws that cannot be removed, matching the exposed portion’s gauge and thread pitch to a size chart will usually identify the full size. A caliper can measure the exposed diameter, and you can count the visible threads to estimate TPI.
9. Where can I find a reliable wood screw size chart?
Reliable size charts are available from fastener manufacturers and distributors. Prince Fastener’s wood screw diameter charts provide both imperial and metric specifications with pilot hole recommendations. Other authoritative sources include Bolt Depot, McMaster-Carr, and the Woodcraft knowledge base. Print a chart and laminate it for your workshop.
10. Can I use metric wood screws in a pilot hole drilled for an imperial screw?
It depends on how close the metric and imperial sizes are. A 4.0 mm metric screw in a pilot hole drilled for a #8 (4.17 mm) imperial screw will be slightly loose, which reduces holding power. A 5.0 mm metric screw in a #10 (4.83 mm) pilot hole will be slightly tight, which may cause splitting. Whenever possible, drill a new pilot hole sized specifically for the screw you are using. The small differences between metric and imperial sizes are enough to affect performance in critical joints.