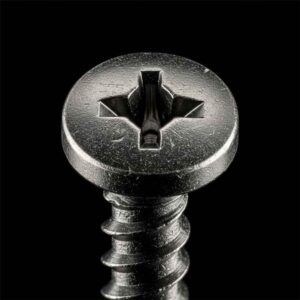
Quer saber como medir um parafuso? Comece verificando o comprimento, o diâmetro e o passo da rosca. Pegue uma régua, um paquímetro ou um medidor de rosca para obter resultados mais precisos. Às vezes, você se pergunta se deve incluir a cabeça na medição ou se precisa usar unidades métricas ou imperiais. Essas dúvidas surgem com frequência quando você está medindo um parafuso para projetos domésticos. Você verá parafusos para madeira, parafusos autorroscantes, e parafusos de máquina em tudo, desde móveis a eletrodomésticos. Os kits de bricolagem com fixadores esgotam-se todos os anos, por isso, medir corretamente um parafuso ajuda-o a fazer o trabalho como deve ser.
Principais conclusões
- Meça o parafuso da ponta até a cabeça. Use uma régua ou um paquímetro para obter uma medição precisa. Se for um parafuso de cabeça chata, meça a cabeça também.
- Para encontrar o diâmetro do parafuso, Meça ao longo das roscas externas. Meça na parte mais larga. Os calibradores ajudam a obter o melhor resultado.
- Conte os fios por polegada para parafusos imperiais. Para parafusos métricos, meça o espaço entre os fios. Isso indica o passo do fio.
- Verifique sempre suas medidas novamente para evitar erros. Coloque o parafuso em uma superfície plana para mantê-lo reto.
- Conheça a diferença entre parafusos imperiais e métricos. Certifique-se de usar o sistema adequado para o seu projeto. Isso ajuda a evitar problemas de encaixe.
Como medir o comprimento do parafuso
Medindo da ponta à cabeça
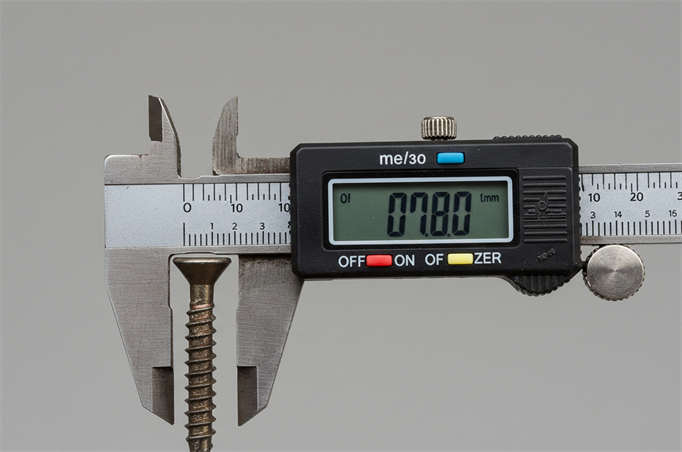
Medir o comprimento de um parafuso pode parecer complicado, mas você pode fazer isso com apenas uma régua ou um paquímetro. Para obter a medição mais precisa, siga estas etapas:
- Coloque o parafuso em uma superfície plana. Certifique-se de que o parafuso esteja reto e não inclinado.
- Alinhe a marca zero da sua régua ou paquímetro com a ponta do parafuso.
- Se você usar um paquímetro, Insira o parafuso no sentido do comprimento. até tocar na base da cabeça. Gire o botão até ouvir um clique para travar a medição.
- Leia o valor na sua régua ou paquímetro. Esse número indica o comprimento do parafuso.
- Para parafusos de cabeça escareada, medida desde o topo da cabeça até a ponta. Para outros parafusos, meça desde a parte inferior da cabeça até à ponta.
Dica: verifique sempre duas vezes suas medições. Se você usar um paquímetro, obterá uma leitura mais precisa do que com uma régua.
Incluindo o chefe ou não
Você pode se perguntar se deve incluir a cabeça ao medir parafusos. A resposta depende do tipo de parafuso que você tem. Aqui está um guia rápido:
| Tipo de parafuso | Método de medição |
|---|---|
| Cabeça chata | Meça desde o topo da cabeça até à ponta. |
| Ponta do pão | Meça desde logo abaixo da cabeça até a ponta. |
Se você tiver um parafuso de cabeça chata, inclua a cabeça na sua medição. Para parafusos de cabeça panela, comece a medir logo abaixo da cabeça. Essa diferença é importante porque afeta a forma como o parafuso se encaixa no seu projeto.
Ferramentas para medir comprimentos
Escolher a ferramenta certa ajuda você a obter os melhores resultados. Veja a seguir algumas ferramentas comuns e sua precisão:
| Tipo de ferramenta | Descrição | Nível de precisão |
|---|---|---|
| Micrômetro para rosca de parafuso | Utiliza pontas especiais para ajustar os ângulos das roscas, garantindo medições precisas. | Alta precisão para medições de roscas. |
| Medidor de passo de rosca | Verifica rapidamente o passo das roscas externas usando lâminas serrilhadas. | Precisão moderada, boa para verificações rápidas. |
| Medição de rosca de 3 fios | Utiliza três fios e um micrômetro para o diâmetro primitivo. | Precisão muito elevada, ideal para trabalhos de precisão. |
A maioria das pessoas usa uma régua ou um paquímetro para medir o comprimento de um parafuso. Os paquímetros fornecem um número mais exato, especialmente se você quiser medir parafusos pequenos. Se você trabalha com muitos parafusos ou precisa ser extremamente preciso, experimente um micrômetro para rosca de parafuso ou uma ferramenta de medição de rosca de 3 fios.
Observação: A umidade pode alterar o tamanho dos parafusos. A alta umidade pode fazer com que os parafusos enferrujem ou inchem, o que pode prejudicar suas medições. Sempre meça os parafusos em um local seco para obter melhores resultados.
Agora você sabe como medir o comprimento do parafuso, quando incluir a cabeça e quais ferramentas usar. Com essas dicas, você pode medir parafusos como um profissional.
Medir o diâmetro do parafuso

Rosca externa para rosca externa
Ao medir o diâmetro do parafuso, você deseja encontrar a largura da parte rosqueada. Este é o ponto mais largo entre as roscas. Não se mede a cabeça ou o eixo sem roscas. Mede-se apenas da borda externa de uma rosca até a borda externa do lado oposto. Isso fornece o diâmetro real.
Aqui está uma maneira simples de fazer isso:
- Segure o parafuso de forma a ver claramente as roscas.
- Coloque sua ferramenta de medição sobre os fios, no ponto mais largo.
- Certifique-se de medir em linha reta, não em ângulo.
- Leia o número na sua ferramenta. Esse é o diâmetro do parafuso.
Este método é utilizado para a maioria dos parafusos, seja em madeira, metal ou plástico. O diâmetro é geralmente o primeiro número que se vê na etiqueta do tamanho do parafuso.
Usando calibradores ou réguas
Você tem algumas opções de ferramentas para medir parafusos. Os calibradores proporcionam a leitura mais precisa. Você pode medir com precisão de milésimos de polegada. As réguas são úteis para verificações rápidas, mas são menos precisas. Se você quiser precisão, use um paquímetro. Se precisar apenas de uma ideia aproximada, uma régua é suficiente.
Aqui está uma rápida comparação entre essas ferramentas:
| Ferramenta de medição | Precisão |
|---|---|
| Calibradores | Até 0,001 polegada |
| Regras | Menos preciso |
| Micrômetros | Mais preciso |
Se você usar um paquímetro, abra as mandíbulas e coloque-as nas roscas externas. Feche as mandíbulas suavemente até que elas toquem ambos os lados. Leia a medida na escala. Se você usar uma régua, coloque-a sobre as roscas e leia o número no ponto mais largo. Sempre verifique duas vezes a medida para evitar erros.
Você pode encontrar parafusos com diâmetros diferentes para trabalhos diferentes. Aqui estão alguns tamanhos comuns que você encontrará na montagem de móveis e em projetos domésticos:
| Tamanho do parafuso | Usos comuns | Notas |
|---|---|---|
| #6 x 1“ | Marcenaria leve, guarnições, dobradiças | Ideal para aplicações internas onde é necessária menos força |
| #8 x 1-1/4″ | Armários, montagem de móveis | A escolha certa para conexões internas de madeira |
| #10 x 1-1/2″ | Drywall em vigas, estruturas pesadas | Oferece uma fixação forte sem partir os pinos |
| #12 x 2″ | Suportes metálicos, ferragens estruturais | Frequentemente utilizado quando é necessária maior aderência |
| #14 x 2-1/2″ | Placas de matrícula, clipes de fixação | Comum em uso externo; combine com revestimentos resistentes à corrosão |
| M6 x 16 mm | Peças automotivas, máquinas leves | Tamanho métrico, usado em construções importadas ou de precisão |
| M4 x 10 mm | Eletrônicos, painéis de eletrodomésticos | Rosca muito pequena e precisa |
Se você estiver medindo parafusos para móveis, provavelmente usará tamanhos como #8 ou #10. Para eletrônicos, você pode encontrar M4 ou menores. Sempre verifique o tamanho antes de iniciar seu projeto.
Dica: se quiser evitar erros, meça duas vezes. Use um paquímetro para obter melhores resultados, especialmente se precisar que o parafuso se encaixe perfeitamente.
Medir parafusos fica mais fácil com a prática. Depois de saber como medir o diâmetro, você poderá escolher sempre o parafuso certo.
Meça o tamanho do parafuso e o passo da rosca
Contagem de fios por polegada (sistema imperial)
Se você quiser medir o tamanho do parafuso para parafusos imperiais, você precisa contar o fios por polegada (TPI). Isso indica quantos picos de rosca existem em cada polegada do parafuso. Veja como fazer:
- Coloque uma régua ao longo das roscas do parafuso.
- Conte o número de picos da rosca em cada 1,27 cm.
- Duplique esse número para obter os fios por polegada.
- Você pode usar um medidor TPI para uma verificação rápida.
Contar os fios ajuda a encontrar o parafuso certo para o seu projeto. Se estiver medindo parafusos para móveis ou reparos, saber o TPI garante que você obtenha o encaixe correto.
Medindo o passo da rosca (métrico)
Os parafusos métricos utilizam o passo da rosca em vez do TPI. Ao medir o passo da rosca, verifica-se a distância entre dois picos da rosca, geralmente em milímetros. O passo indica a distância que o parafuso se move a cada volta. Verá valores de passo diferentes para cada tamanho.
Aqui está uma tabela que mostra o passo padrão e fino para tamanhos comuns de parafusos métricos:
| Tamanho do parafuso | Padrão / Passo grosso (mm) | Passo fino (mm) |
|---|---|---|
| M1.6 | 0.35 | - |
| M2 | 0.40 | - |
| M2,5 | 0.45 | - |
| M3 | 0.50 | - |
| M3.5 | 0.60 | - |
| M4 | 0.70 | - |
| M5 | 0.80 | - |
| M6 | 1.00 | - |
| M8 | 1.25 | 1.00 |
| M10 | 1.50 | 1.25 |
| M12 | 1.75 | 1.50 |
| M14 | 2.00 | 1.50 |
| M16 | 2.00 | - |
| M18 | 2.50 | - |
| M20 | 2.50 | - |
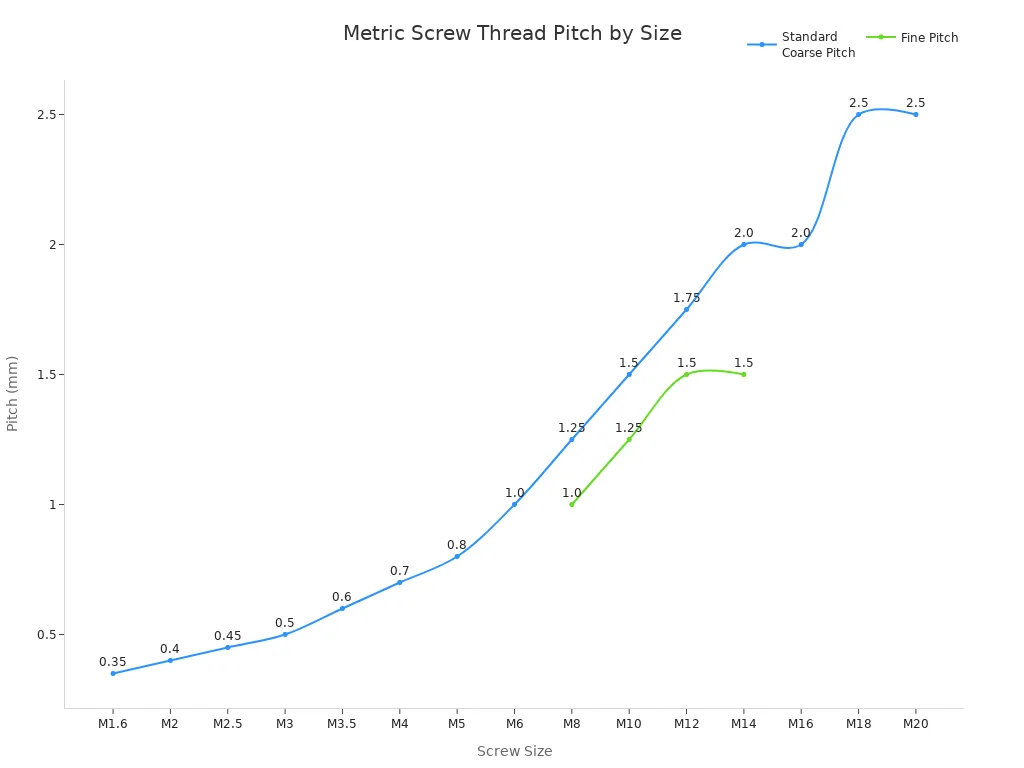
Se você estiver medindo o passo da rosca em parafusos automotivos, notará alguns tamanhos comuns, como M10x1,25 ou M12x1,75. Esses números ajudam a escolher o parafuso certo para carros ou máquinas.
Utilizando calibradores de rosca
Os calibres para roscas facilitam muito a medição do passo da rosca e do tamanho do parafuso. Basta encaixar o calibre nas roscas até encontrar o encaixe perfeito. Esta ferramenta ajuda a evitar erros e garante que os parafusos funcionem com porcas ou furos roscados.
- Os calibres de passo de rosca são importante nos setores automotivo, de construção e aeroespacial trabalho.
- Eles ajudam você a obter medições precisas, o que mantém os fixadores confiáveis.
Ao medir o tamanho do parafuso, você verá roscas grossas e finas. As roscas grossas funcionam bem em condições adversas e resistem a danos causados pela sujeira. As roscas finas são mais resistentes e melhores para trabalhos precisos. Aqui está uma comparação rápida:
| Recurso | Fios Grosseiros | Fios finos |
|---|---|---|
| Força | Mais frágil do que fios finos | Mais resistente devido à maior área de tensão |
| Suscetibilidade ao afrouxamento | Mais propenso a se soltar devido à vibração | Menos suscetível devido ao passo raso |
| Adequação para materiais | Adequado para condições adversas e construção | Melhor para medições precisas e materiais duros |
| Facilidade de toque | Mais difícil de perfurar materiais duros | Mais fácil de perfurar materiais duros |
| Requisito de torque | Requer mais torque para pré-carga equivalente | Requer menos torque para pré-carga equivalente |
Os fios finos têm maior resistência à tração. e permitem ajustes mais precisos. As roscas grossas são adequadas para trabalhos pesados e resistem a danos. Ao medir parafusos, verifique sempre se você precisa de roscas grossas ou finas para o seu projeto.
Dica: use um medidor de rosca ao medir o passo da rosca. Isso economiza tempo e ajuda a obter o tamanho certo sempre.
Sistemas imperiais vs. métricos
Principais diferenças
Você pode notar que os parafusos vêm em dois Principais sistemas de medição: imperial e métrico. O sistema que você usa geralmente depende de onde você mora ou de onde vem o seu projeto. Nos Estados Unidos, geralmente se vê parafusos imperiais. A maioria dos outros países usa parafusos métricos. Se você trabalha com móveis ou carros importados, provavelmente encontrará tamanhos métricos.
Os parafusos imperiais utilizam polegadas e frações. A densidade da rosca é medida em Roscas por polegada (TPI). Por exemplo, um parafuso pode ser rotulado como “#8-32”, o que significa tamanho 8 com 32 roscas por polegada. Os parafusos métricos utilizam milímetros tanto para o comprimento como para o diâmetro. Em vez de TPI, os parafusos métricos utilizam o passo da rosca, que é a distância entre as roscas em milímetros. Por exemplo, um parafuso M6 x 1,0 tem 6 mm de largura com um passo de rosca de 1,0 mm.
Dica: verifique sempre qual sistema o seu projeto utiliza antes de comprar parafusos. Misturá-los pode causar dores de cabeça!
Aqui está uma rápida visão geral de como parafusos imperiais e métricos compare:
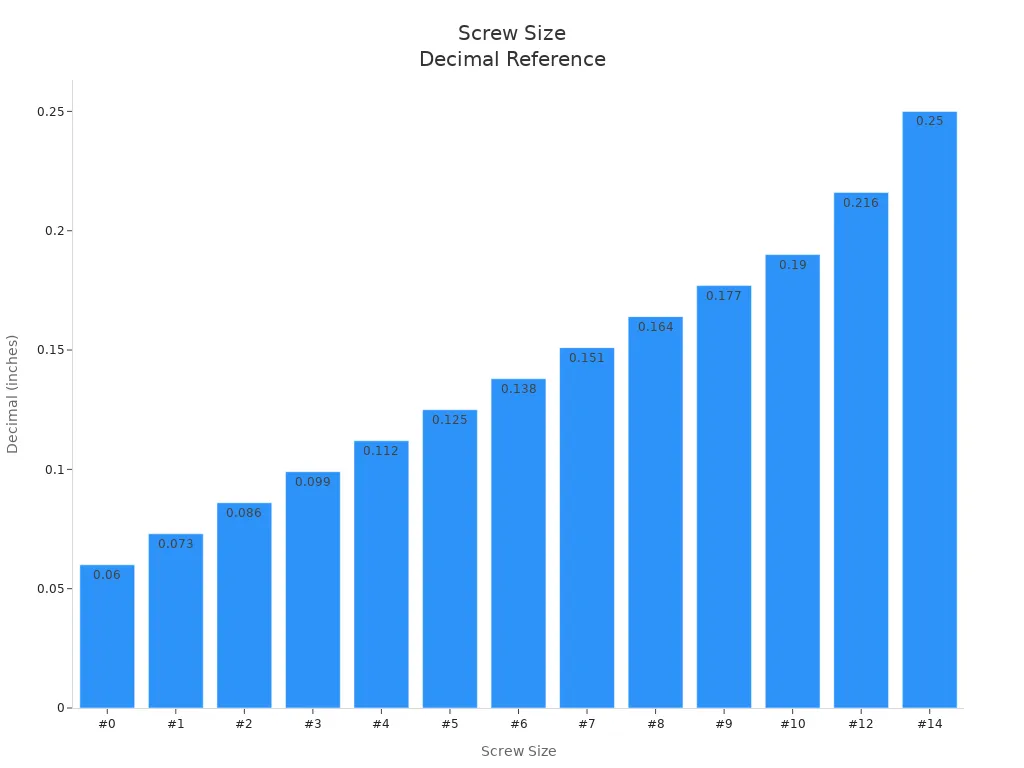
| Tamanho do parafuso | Polegada Decimal | Fração mais próxima | Equivalente métrico |
|---|---|---|---|
| #6 | 0,138 pol. | 9/64″ | 3,51 mm |
| #8 | 0,164 pol. | 5/32″ | 4,17 mm |
| #10 | 0,190 pol. | 3/16″ | 4,83 mm |
| #12 | 0,216 pol. | 7/32″ | 5,49 mm |
| #14 | 0,250 pol. | 1/4″ | 6,35 mm |
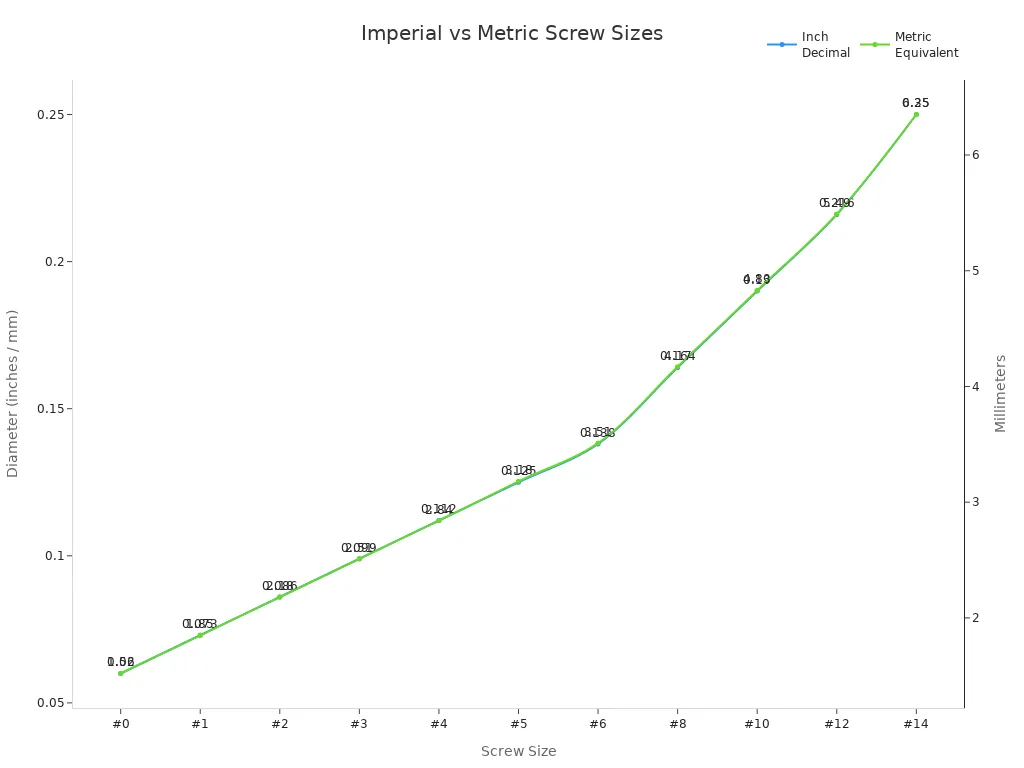
Tabela de conversão simples
Se você precisar combinar parafusos imperiais com métricos, use esta tabela como referência rápida. Ela ajuda a encontrar o tamanho mais próximo quando você tem apenas um sistema à disposição.
| TAMANHO IMPERIAL (NÃO x POLEGADAS) | TAMANHO MÉTRICO (MM APROX.) |
|---|---|
| 6 x 1 | 3,5 x 25 |
| 8 x 1 | 4,0 x 25 |
| 8 x 1 1/2 | 4,0 x 40 |
| 10 x 2 | 5,0 x 50 |
| 12 x 2 | 6,0 x 50 |
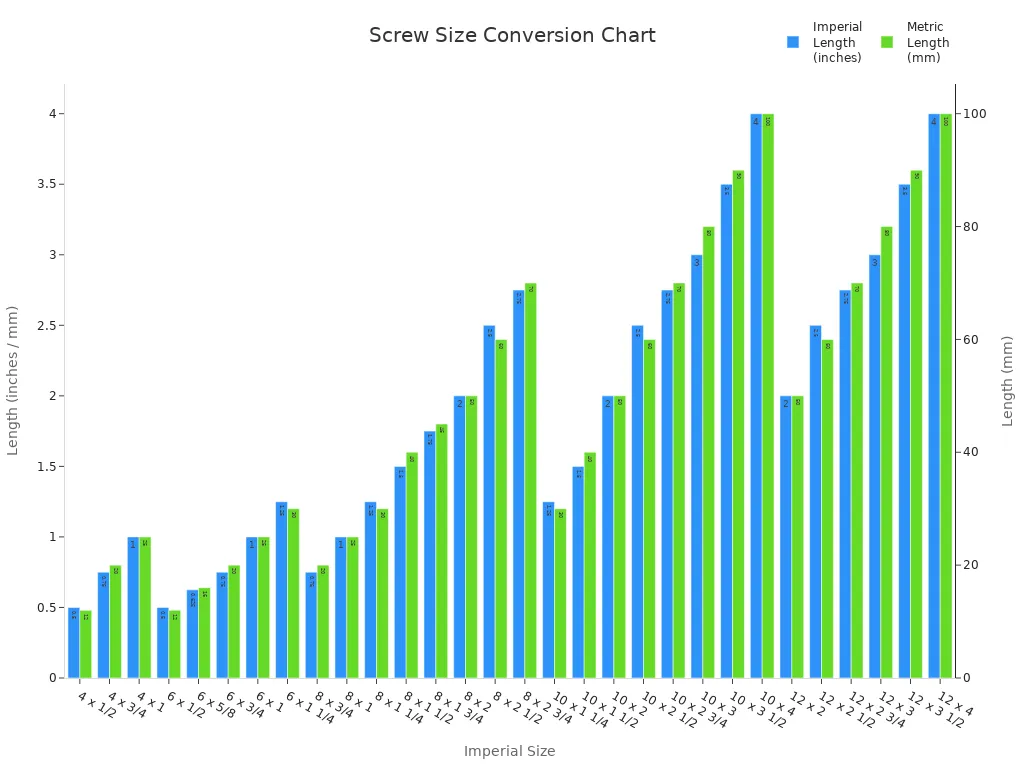
Observação: essas conversões são aproximadas, mas não exatas. Sempre verifique novamente o ajuste antes de iniciar seu projeto.
Agora você sabe como identificar a diferença entre parafusos imperiais e métricos. Com essas tabelas, você poderá escolher sempre o parafuso certo.
Erros comuns e dicas
Evitar erros
Você pode pensar que medir parafusos é simples, mas pequenos erros podem levar a grandes problemas. Aqui estão alguns erros comuns que as pessoas cometem:
- Medir a parte errada do parafuso. Às vezes, você mede a cabeça em vez da parte rosqueada.
- Usar a ferramenta errada. Uma régua pode parecer fácil, mas pode dar um resultado impreciso. Calibradores ou medidores de rosca funcionam melhor.
- Não verificar o tipo de cabeça. Parafusos de cabeça chata e de cabeça cilíndrica requerem métodos de medição diferentes.
- Ignorando o passo da rosca. Se você esquecer de verificar o passo, o parafuso pode não se encaixar.
- Ler a régua em ângulo. Isso pode fazer com que sua medição fique alguns milímetros errada.
Dica: sempre meça em uma superfície plana. Isso ajuda a manter o parafuso reto e obter uma leitura precisa.
Verificação dupla das medições
Você quer que seu projeto corra bem, por isso é fundamental verificar duas vezes as suas medidas. Aqui estão algumas dicas práticas para ajudá-lo a acertar sempre:
- Use um paquímetro para medir o diâmetro externo da rosca. Isso fornece o tamanho nominal.
- Para parafusos com cabeça saliente, meça da base da cabeça até a ponta. Para parafusos escareados, inclua a cabeça na sua medição.
- Pegue um calibrador de rosca e encaixe-o nas saliências da rosca. Isso ajuda a encontrar o passo correto.
- Observe o formato da cabeça. Isso indica qual ferramenta você precisa para a instalação.
Aqui está uma tabela rápida para ajudá-lo a lembrar o que verificar:
| Etapa | O que fazer | Por que é importante |
|---|---|---|
| Medir o diâmetro | Use um paquímetro nas roscas externas | Garante o ajuste correto |
| Medir comprimento | Verifique se o cabeçalho deve ser incluído | Parafusos correspondentes ao projeto |
| Identificar o tom | Use um medidor de rosca | Evita ajustes inadequados |
| Verifique o tipo de cabeça | Observe o formato da cabeça | Escolha a chave de fenda certa |
🛠️ Verifique duas vezes as suas medidas antes de comprar ou instalar parafusos. Isso poupa-lhe tempo e evita frustrações.
Medir parafusos fica mais fácil com a prática. Se você diminuir o ritmo e seguir estas etapas, evitará a maioria dos erros e escolherá sempre o parafuso certo.
Você pode medir um parafuso com confiança se seguir alguns passos simples. Comece colocando o parafuso em uma superfície plana e use uma régua ou um paquímetro para medir seu comprimento e diâmetro. Pegue um medidor de passo de rosca ou contar os fios para encontrar o passo. Aqui está uma lista rápida para ajudá-lo a medir um parafuso sempre:
- Meça o comprimento a partir do ponto correto.
- Meça o diâmetro na rosca mais larga..
- Verifique o passo da rosca com um medidor ou régua.
Mantenha um guia de referência rápida à mão. Muitos guias oferecem Tabelas com tamanhos de parafusos e medidas decimais, como esta:
| Tamanho do parafuso | Decimal |
|---|---|
| #6 | .138 |
| #8 | .164 |
| #10 | .190 |
Guarde os parafusos em um local seco e organize-os por tamanho. Você verá que, com um pouco de prática, poderá medir um parafuso com precisão para qualquer projeto.
Perguntas frequentes
Como saber se deve medir o parafuso com a cabeça incluída?
Você verifica o tipo de parafuso primeiro. Se você vir uma cabeça plana ou escareada, meça da parte superior da cabeça até a ponta. Para outras cabeças, comece logo abaixo da cabeça.
Qual ferramenta fornece a medição mais precisa dos parafusos?
Você obtém os melhores resultados com um paquímetro digital. Ele mede comprimentos e diâmetros com precisão até frações mínimas. Se quiser fazer uma verificação rápida, use uma régua.
É possível medir o passo do parafuso sem um calibrador de rosca?
Sim, você pode contar os fios ao longo de uma polegada para parafusos imperiais. Para parafusos métricos, meça a distância entre dois picos de rosca com uma régua. Um medidor de rosca torna isso mais rápido.
Por que os parafusos vêm em tamanhos imperiais e métricos?
Os fabricantes utilizam sistemas diferentes em países diferentes. Os tamanhos imperiais são mais comuns nos EUA, enquanto os tamanhos métricos são mais utilizados na Europa e na Ásia. Verifique sempre os requisitos do seu projeto.
E se você não tiver um paquímetro ou um calibrador de roscas?
Dica: use uma régua para medir o comprimento e o diâmetro. Para medir o passo, conte os fios ou meça a distância entre eles. Você pode pegar ferramentas emprestadas em uma loja de ferragens se precisar de mais precisão.