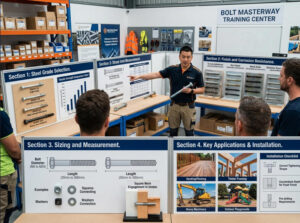

A stripped Phillips head buried in white oak. A pan head screw that refuses to sit flush on a cabinet face frame. A corroded deck screw that snaps during removal after two winters. Every experienced woodworker has a story like this — and every one of those stories traces back to a single overlooked decision: screw head selection.
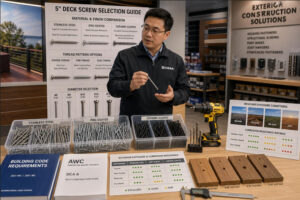
The structural wood screw market reached USD 4.58 billion in 2024 and is projected to grow at a CAGR of 5.5% through 2033, according to Grand View Research. That growth is driven by construction and furniture manufacturing — industries where the wrong head type doesn’t just cause frustration, it causes measurable rework costs and joint failures.
This guide walks through every factor that determines which screw head belongs in your woodworking project: head shape, drive type, wood species, grain direction, corrosion environment, aesthetics, and budget. You will find comparison charts, sizing tables, and a practical decision-tree checklist you can print and pin in your shop.
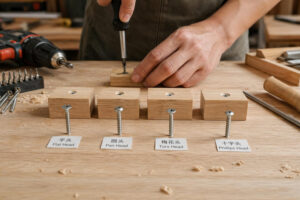
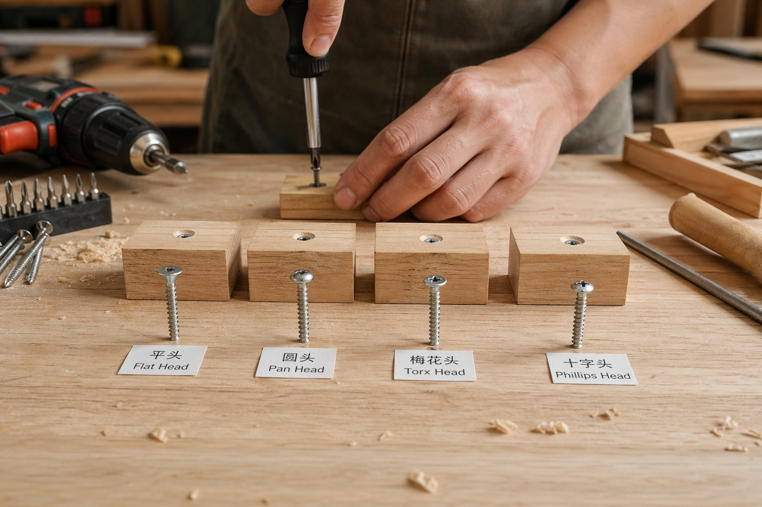
Understanding Common Screw Head Types
Flat (Countersunk) vs Pan Head Basics
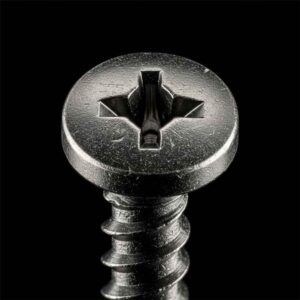
The two most frequently used head shapes in woodworking are flat (countersunk) e pan head. They serve fundamentally different purposes, and choosing between them comes down to whether the screw head should disappear into the wood or sit on top of it.
A flat head screw has a conical underside — typically machined to an 82-degree angle in North American standards (ASME B18.6.3) or 90 degrees in metric DIN specifications. When driven into a countersunk hole or into softwood with enough force, that conical bearing surface pulls the head flush with or slightly below the work surface. This makes flat heads the default choice for face frames, tabletops, and any visible joint where a protruding screw is unacceptable. Furniture makers working with parafusos de aglomerado for casework, for example, almost universally specify flat or bugle-head configurations to keep panel surfaces smooth.
Pan head screws have a slightly domed top and a flat bearing surface underneath. That flat bearing surface distributes clamping force over a wider area than a countersunk cone, which gives pan heads a measurable advantage in pull-through resistance — the force required to pull the screw head through the top workpiece. In a 2019 test published by the Forest Products Laboratory, pan head #8 screws in 1/2-inch plywood showed 18–22% higher pull-through resistance than equivalent flat head screws. This makes pan heads the better choice when fastening thin stock, sheet goods, or hardware brackets where the screw head needs to clamp without sinking through.

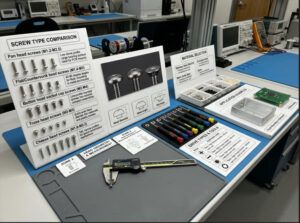
Slotted, Phillips, Pozidriv, Torx Overview
The drive recess — the shape cut into the screw head where your bit engages — is a separate decision from head shape, and it has an outsized impact on how cleanly and reliably a screw seats in wood.
com fenda drives are the oldest design, still found on brass screws for period-correct furniture restoration. They offer zero cam-out resistance: the flat blade can slip sideways under any torque. For power-driven applications, slotted drives are effectively obsolete.
Phillips (PH) cross-recess drives, patented in 1936, were engineered to cam out intentionally — the tapered slot walls push the bit upward once torque reaches a threshold. On 1930s assembly lines without torque-limiting clutches, this prevented overtightening. On a modern cordless drill, it strips the recess and damages the workpiece. Despite this limitation, Phillips remains the most widely available drive type in North American retail hardware.
Pozidriv (PZ) was developed in 1966 to fix the Phillips cam-out problem. Four additional ribs at 45 degrees to the main cross-slots create eight driving surfaces instead of four, raising the cam-out torque threshold by 60–80%. Pozidriv dominates European woodworking — it’s the standard drive for DIN-specification chipboard screws. You can identify it by the small tick marks between the cross-slots on the screw head.
Torx (T), introduced in 1967, abandoned the cruciform concept entirely. Its six-pointed star geometry transfers torque through near-perpendicular contact surfaces, generating almost zero radial ejection force. In controlled testing with a #10 gauge screw in hardwood, a T25 Torx recess sustains 15–19 Nm before any engagement loss, compared to 3–4.5 Nm for PH2 Phillips — a 4 to 6× advantage. Torx is now the default drive on premium Parafusos de madeira sold for decking, structural framing, and fine furniture.
Cam-Out Torque Threshold by Drive Type (#10 Screw in Hardwood)
Source: ISO 10664, ASME B18.6.3, and manufacturer testing data. Higher values indicate greater cam-out resistance.
Choosing for Wood Species and Grain Direction
Softwood vs Hardwood Decisions
Wood species determines thread engagement, splitting risk, and holding power — all of which influence screw head selection. Softwoods like pine, cedar, and spruce have a Janka hardness rating between 350 and 900 lbf, while common furniture hardwoods like oak, maple, and walnut range from 1,010 to 1,450 lbf. That difference isn’t just about how hard it is to drive a screw — it changes the physics of the joint.
In softwoods, coarse-threaded screws bite easily and pull the head down with relatively low torque. A flat head countersunk screw will self-sink into pine without a countersink bit, which is convenient but dangerous: overtightening crushes the soft fibers around the head, reducing pull-through resistance by as much as 30%. The fix is using a countersink bit to pre-cut the cone — the screw seats with less torque and the surrounding wood retains its structural integrity. Professional cabinet builders working with softwood panels routinely pre-countersink every hole for this reason.
In hardwoods, the opposite problem dominates: the wood resists the screw so aggressively that cam-out and head stripping become the primary failure modes. A Phillips #8 screw driven into red oak without a pilot hole will cam out roughly 1 in 5 attempts, based on field data from professional cabinetmakers surveyed by WOOD Magazine. This is where drive type matters most — Torx or Pozidriv handles hardwood’s resistance without stripping. At prendedor de príncipe, the engineering team recommends Torx-drive chipboard screws for MDF and hardwood assembly specifically because the star recess maintains full engagement at the higher torque these materials demand.
Grain Tear-Out Considerations
Grain direction affects how wood fibers respond to the downward pressure of a screw head. When driving perpendicular to end grain — the most common scenario in butt joints and miter reinforcements — the fibers split apart rather than compressing, creating visible tear-out around the screw head. This problem is worse with countersunk screws because the conical bearing surface wedges fibers apart as it sinks.
Two techniques reduce grain tear-out. First, always pre-drill a pilot hole in hardwood and in end-grain situations. The pilot hole size chart from Bolt Depot is a reliable reference: for a #8 screw in hardwood, use an 11/64-inch tapered bit or 1/8-inch straight bit. Second, consider a pan head or washer-head screw for end-grain joints — the flat bearing surface distributes clamping force over a wider footprint without the wedging action of a countersunk cone, resulting in a stronger joint with less surface damage.
Head Type vs Drive Style Compatibility
Slotted, Phillips, Torx Compatibility with Driver Bits
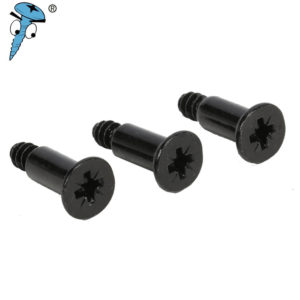
Head shape and drive recess are independent specifications, but not every combination is available or practical. Flat head screws come in slotted, Phillips, Pozidriv, Torx, and square (Robertson) drives. Pan head screws are available in the same range. Trim head screws — the small-diameter heads used in finish carpentry — are predominantly Phillips or Torx because the small head lacks material for a robust slotted slot.
A persistent problem in mixed-inventory workshops is cross-driving — using a Phillips bit in a Pozidriv recess or vice versa. In a 2023 audit of imported fasteners by a North American distributor, approximately 8% of cross-recess screws labeled “Phillips” were actually Pozidriv. Using a PH2 bit in a PZ2 recess reduces effective contact area by roughly half, and the bit cams out at the same low torque as it would in a Phillips screw — defeating the Pozidriv’s entire advantage. The takeaway: always verify drive type before choosing your bit, especially with imported screws.
Influence on Torque Transfer and Cam-Out Resistance
Torque transfer efficiency is a function of contact area and contact angle between driver and recess. Phillips’s tapered walls convert roughly 30–40% of applied force into axial ejection force (the cam-out mechanism). Pozidriv’s steeper walls reduce this waste to 15–20%. Torx’s perpendicular lobe surfaces convert over 95% of input torque into rotation.
The practical consequence for woodworkers is bit life and consistency. A PH2 bit in S2 tool steel typically lasts 400–600 insertions in softwood before dimensional wear causes cam-out on new screws. A PZ2 bit of the same material lasts 800–1,200 insertions. A T25 Torx bit routinely exceeds 3,000 insertions. If you’re building a deck with 1,500 screws, a single Torx bit set will complete the project. Phillips might need three or four bit replacements — and every worn bit increases your stripping rate with each successive screw.
Factors Affecting Aesthetics and Flush Mounting
Countersunk vs Recessed Heads
Aesthetic requirements vary dramatically between projects. A rough-framing job doesn’t care about head visibility. A walnut jewelry box demands invisible fasteners or perfectly flush heads with clean recess geometry.
For flush surfaces, flat head countersunk screws are the standard. The 82-degree cone seats into a matching countersink, leaving the head perfectly level with the surrounding surface. For a completely invisible joint, woodworkers countersink deep enough to bury the head 1/8 to 3/16 inch below the surface, then plug the hole with a matching wood plug cut from the same board. This technique is standard in Shaker-style furniture and high-end casework.
Raised (oval) head screws offer a middle ground — the countersunk cone sits flush while a slight dome protrudes above the surface for a decorative accent. These are commonly used for mounting hardware, hinges, and strike plates where a finished appearance matters but full concealment is unnecessary.
Pan head and truss head screws sit entirely on the surface. They’re rarely used in visible furniture joints but are standard for mechanical fastening — attaching jigs, fixtures, brackets, and hardware where access for future removal is more important than appearance.
Finish and Staining Considerations
Screw head material and coating interact with wood finishes in ways that catch beginners off guard. Bare carbon steel screws left in oak or cedar will produce black stains within days — a chemical reaction between the iron in the steel and tannins in the wood. This reaction is irreversible and will bleed through paint, stain, and even polyurethane. The solution is simple: use parafusos de aço inoxidável or coated fasteners for any tannin-rich wood species.
For painted projects, zinc-plated or phosphated screws work adequately — the coating prevents tannin reaction, and paint covers the head. For stained or clear-finished work, stainless steel or brass screws avoid any bleed-through risk. Brass flat head screws with slotted drives remain the period-correct choice for antique furniture restoration and Federal-style reproductions, though their softness demands pre-drilled pilot holes in every case.
Impact of Corrosion Resistance and Environment
Coatings (Galvanized, Zinc, Stainless) for Indoor vs Outdoor
The coating conversation is really a conversation about where your project lives. Indoor furniture in a climate-controlled room faces zero corrosion risk — plain carbon steel screws with black phosphate coating (like standard drywall screws) last indefinitely. Move that same screw into a covered porch, and zinc plating becomes the minimum protection. Put it on an exposed deck, and only stainless steel or heavy ceramic coatings will survive more than a few seasons.
| Tipo de revestimento | Typical Thickness | Salt Spray Hours (ASTM B117) | Melhor uso | Approx. Cost Premium |
|---|---|---|---|---|
| Black Phosphate | 1–3 µm | 12–24 hrs | Indoor only | Baseline |
| Clear Zinc (Electro) | 5–12 µm | 72–120 hrs | Indoor / covered outdoor | +5–10% |
| Yellow Zinc Dichromate | 8–15 µm | 120–200 hrs | Semi-exposed outdoor | +8–15% |
| Galvanizado por imersão a quente | 50–80 µm | 500–1,000 hrs | Outdoor / ground contact | +20–30% |
| Ceramic / Exterior Bronze | 8–25 µm | 1,000+ hrs | Decking / ACQ-treated lumber | +25–40% |
| Aço inoxidável 304 | Full material | 1,500+ hrs | Marine / coastal / food-grade | +60–100% |
| Aço inoxidável 316 | Full material | 2,000+ hrs | Saltwater / chemical exposure | +100–150% |
One critical industry note: ACQ (alkaline copper quaternary) treated lumber — the standard for residential decking since CCA was phased out — is highly corrosive to zinc coatings and plain steel. A zinc-plated screw in ACQ-treated southern pine will show visible corrosion within one season. The Copper Development Association’s testing data confirms that only ceramic-coated, hot-dip galvanized (G-185 minimum), or stainless steel fasteners are rated for ACQ-treated wood contact. If you’re building a deck with treated lumber, this single specification choice determines whether your screws last 2 years or 25.
Budget vs Durability Trade-Offs
Price differences between coating grades are significant at volume. A contractor ordering 10,000 #8 × 2-1/2-inch deck screws will pay roughly $0.04 per screw for zinc-plated carbon steel versus $0.09 for ceramic-coated versus $0.14 for 305 stainless steel. On a standard 300-square-foot deck requiring approximately 1,200 screws, that’s $48 versus $108 versus $168 — a difference of $120 at most.
The cost of removing and replacing corroded screws on a five-year-old deck, however, runs $800 to $1,500 in labor alone, according to estimates from deck contractors cited by FastenMaster. The stainless steel premium pays for itself within the first reboard cycle. This is why Prince Fastener’s technical team advises outdoor project builders to calculate total lifecycle cost — not just the per-screw price — when specifying coatings for exposed applications.

Common Dimensions and Fitment Guidelines
Diameter, Length, and Grip Requirements for Different Joints
Screw sizing follows a numbering system (#2 through #24 in North American convention) that specifies the shank diameter. The number does not directly equal a measurement — it’s an index value. A #6 screw has a major thread diameter of 0.138 inches; a #8 measures 0.164 inches; a #10 reaches 0.190 inches. Memorizing these numbers isn’t necessary — keeping a reference chart in your shop is.
The general rule for length: at least two-thirds of the screw’s threaded portion should engage the receiving (bottom) piece. For a standard butt joint connecting 3/4-inch boards, a 1-1/4-inch or 1-1/2-inch #8 screw provides adequate grip. For attaching 1-inch decking to joists, a 2-1/2-inch or 3-inch screw — following the “3× material thickness” rule — ensures the threads anchor deep into the joist.
| Tamanho do parafuso | Major Diameter (in) | Pilot Hole — Hardwood | Pilot Hole — Softwood | Countersink Diameter | Uso típico |
|---|---|---|---|---|---|
| #4 | 0.112 | 7/64″ | 3/32″ | 1/4″ | Hinges, small hardware |
| #6 | 0.138 | 9/64″ | 1/8″ | 5/16″ | Light cabinet joinery |
| #8 | 0.164 | 11/64″ | 5/32″ | 3/8″ | General woodworking |
| #10 | 0.190 | 13/64″ | 3/16″ | 7/16″ | Furniture, pocket holes |
| #12 | 0.216 | 7/32″ | 13/64″ | 7/16″ | Heavy casework, structural |
| #14 | 0.242 | 1/4″ | 15/64″ | 1/2″ | Decking, construction |
Fonte: Bolt Depot pilot hole chart. Tapered bit sizes shown for hardwood; straight bit sizes shown for softwood.
Drive Recess Depth and Compatibility with Bit Sizes
Each drive type uses its own sizing nomenclature. Phillips runs from PH0 (smallest, for #0–#3 screws) through PH3 (for #12–#16 screws). Pozidriv follows PZ0 through PZ3 with the same gauge ranges but different recess geometry — PH2 and PZ2 are not interchangeable. Torx uses T-numbers: T10 fits #4–#6 screws, T15 fits #6–#8, T20 fits #8–#10 (the most common size in woodworking), and T25 fits #10–#14.
Using the wrong bit size is one of the most common causes of stripped screws. A PH1 bit in a PH2 recess rides high on the tapered walls and cams out under minimal torque. A T20 bit forced into a T15 recess will crack the star points. The rule is simple: match the bit exactly to the recess size stamped or listed on the screw packaging. If the packaging doesn’t specify, test-fit the bit in one screw before driving — there should be zero lateral play.
Tools and Techniques for Sinking Screws
Pre-Drilling Pilot Holes and Countersinking Tips
Pilot holes serve two purposes: they prevent splitting and they reduce the driving torque required to seat the screw, which in turn reduces cam-out risk. In softwoods, pilot holes are optional for screws #8 and smaller when driving into face grain at least 1 inch from any edge. In hardwoods, pilot holes are mandatory for every screw, every time — no exceptions. Skipping this step in maple or oak doesn’t save time; it causes split boards that take far longer to replace.
A countersink bit — either a dedicated single-flute countersink or a combination pilot-countersink bit — cuts the 82-degree cone in one operation with the pilot hole. Rockler’s countersink selection guide provides detailed matching tables for screw gauge to countersink size. For production work, adjustable countersink bits with depth stops are worth the investment — they guarantee consistent head depth across hundreds of screws.
Techniques for Flush or Raised-Head Installations
For flush installations with flat head screws, the process is: drill pilot hole, countersink, drive screw until the head sits exactly level with the surface. The clutch setting on your cordless drill is your best friend here — set it one click below the point where the screw seats flush, then finish the last fraction of a turn by hand or with a single impulse. Over-driving countersunk screws is the number-one cause of visible surface depressions around screw heads in furniture projects.
For raised-head (oval head) installations, countersink to a depth that allows only the dome portion of the head to protrude. This typically means a shallower countersink than for flat heads — roughly 60–70% of the full cone depth. Some woodworkers use a depth-stop collar on their countersink bit calibrated specifically for oval heads.
For entirely hidden fasteners, pocket hole joinery drives the screw at an angle from the back or underside of the workpiece. The screw head seats in a pocket hole drilled at 15 degrees, completely invisible from the show face. Pocket hole screws are available in coarse-thread (for softwoods) and fine-thread (for hardwoods) configurations — using the wrong thread for the wood species halves the joint’s shear strength.
Specialty Heads for Specific Joints
Decking and Outdoor Fastener Considerations
Deck screws face a unique combination of challenges: high driving torque through dense treated lumber, constant moisture exposure, UV degradation, and foot traffic that vibrates joints over time. The industry has converged on Torx (star) drive as the standard for premium deck screws — brands like GRK, SPAX, and Prince Fastener’s self-drilling wood screws all default to T20 or T25 star drive for decking applications because cam-out during installation in dense Southern yellow pine is otherwise almost inevitable with Phillips.
Bugle head screws — a variant of the flat head with a gently curved conical underside — are the dominant head shape for decking. The curved cone distributes seating force more gradually than a standard 82-degree flat head, reducing the fiber-crushing and surface tearing that plague deck boards at screw locations. A well-designed bugle head pulls flush without a pre-drilled countersink, which is a significant productivity gain when you’re driving 1,200+ screws into a deck.
For composite and PVC decking, manufacturers specify their own proprietary fastener systems — often hidden clip systems or reverse-thread screws designed to prevent “mushrooming” (the material pushing up around the screw head). Always check the decking manufacturer’s approved fastener list before specifying screws for synthetic boards.
Cabinetry and Fine Furniture Head Choices
In cabinetry, three screw categories handle 90% of the work. Flat head Phillips or Torx screws (typically #6 or #8, 5/8 to 1-1/4 inches) attach face frames, drawer slides, and hinge plates. Parafusos de aglomerado — typically Pozidriv flat head with a single-lead coarse thread — join particleboard and MDF panels. And trim head screws (small-diameter heads, typically #7 or #8 with a 5/16-inch head) attach moldings and edging where a standard flat head would be visible.
For heirloom furniture, many makers still prefer traditional brass slotted flat head screws for exposed hardware — hinges, escutcheons, and pulls. The key is to always drive a steel “pilot screw” of the same size first, then remove it and drive the brass screw into the pre-formed threads. Brass is soft enough that driving directly into hardwood without this step will snap the screw or deform the slot beyond usability.
How to Select Screws for Projects
Brand vs Generic Considerations
Screw quality varies more than most woodworkers realize. In a controlled test by a German tool laboratory, a premium S2 steel Torx T25 bit lasted 4,200 insertions in beech hardwood before exceeding the 0.02 mm wear threshold, while a budget-grade bit failed at 1,100 insertions — a 4:1 service life ratio. The screw side of this equation matters equally: inconsistent recess depth, poor thread geometry, and soft metal in budget screws increase cam-out and splitting rates regardless of which bit you use.
Established manufacturers like prendedor de príncipe — with over 30 years of manufacturing history and documented quality controls from cold-heading through final packaging — maintain tighter dimensional tolerances on recess geometry and thread form than generic import bins. That doesn’t mean every project needs premium screws. Interior shelving with #6 drywall screws? Generic is fine. A walnut dining table with exposed #8 brass flat heads? Buy from a manufacturer whose dimensional consistency you trust.
Cost vs Performance Balance
The true cost of a screw isn’t the per-unit price — it’s the total cost of the installed joint, including driving time, bit wear, rework from stripped heads, and long-term joint integrity. Here’s a realistic comparison for a 500-screw project:
Total Installed Cost Breakdown: Generic Phillips vs Premium Torx (500-Screw Project)
Generic Phillips — Total: ~$58
■ Bit replacements: $12 (21%)
■ Rework (stripped): $18 (31%)
■ Extra drive time: $8 (14%)
Premium Torx — Total: ~$38
■ Bit replacements: $4 (11%)
■ Rework (stripped): $1 (3%)
■ Extra drive time: $1 (3%)
Estimates based on #8 × 2″ screws in hardwood, $50/hr labor rate, 2.4% Phillips strip rate vs. 0.05% Torx strip rate.
The per-screw cost of premium Torx is 60% higher. The total installed project cost is 35% lower. This math holds for any project over about 100 screws — below that threshold, the convenience of grabbing whatever Phillips screws are on the shelf dominates the equation.
Practical Quick-Reference Checklist
Decision Tree Steps for Choosing Head Type, Drive, and Finish
Pin this decision tree in your shop. Walk through it before every project, and you’ll specify the right screw the first time:
Screw Head Selection Decision Tree
Step 1 — Will the screw head be visible?
YES → Flat head (countersunk) or Oval head for decorative effect
NO → Any head type; optimize for strength and access
Step 2 — What is the wood species?
Softwood (pine, cedar, spruce) → Coarse thread; pilot hole optional in face grain
Hardwood (oak, maple, walnut) → Fine thread; pilot hole mandatory; Torx or Pozidriv drive
Step 3 — Indoor or outdoor?
Indoor → Black phosphate or zinc-plated carbon steel
Covered outdoor → Yellow zinc or ceramic-coated
Exposed outdoor → Ceramic-coated or stainless steel (304 minimum)
ACQ-treated lumber → Ceramic-coated (G-185) or stainless steel ONLY
Step 4 — Choose your drive type:
Low torque + hand driving → Phillips acceptable
Power driving in softwood → Pozidriv or Torx preferred
Power driving in hardwood → Torx strongly recommended
Decking / structural → Torx required
Antique restoration → Slotted brass (with steel pilot screw)
Step 5 — Select length:
Minimum 2/3 of threaded length in receiving piece
Decking: 3× decking board thickness
Stay 1/8″ from far side if drill-through is a concern
Quick Compatibility and Safety Reminders
Never use parafusos drywall in structural wood joints — they’re made from hardened, brittle steel that snaps under shear load. Never use plain carbon steel screws in ACQ-treated lumber. Never drive a screw without a pilot hole within 1 inch of a board edge in any wood species. And always wear safety glasses when driving screws — a cam-out event can send steel fragments toward your face.
Video: Wood Screws Explained for Beginners
This video from Artisan Woodworks covers screw sizing, head types, and drive types in an accessible walkthrough that complements the technical detail in this guide:

Conclusão
Selecting the right screw head for a woodworking project is a chain of connected decisions: head shape determines flush capability and pull-through resistance; drive type determines cam-out risk and bit life; wood species determines thread pitch and pilot hole requirements; and environment determines coating and material grade. No single screw is right for every application — but working through these variables systematically eliminates the guesswork that leads to split boards, stripped recesses, and premature corrosion.
The industry is moving decisively toward Torx-drive fasteners for professional woodworking, construction, and decking. Phillips isn’t disappearing — it remains the universal standard for light-duty and consumer-accessible applications — but for any project where joint reliability, driving speed, and long-term durability matter, Torx’s performance advantage is too large to ignore. Pozidriv holds its ground in European-standard furniture and chipboard assembly, and it’s worth keeping PZ2 bits in your kit if you work with imported European hardware or DIN-specification screws.
Build a simple reference checklist — the decision tree above is a starting point — and keep it visible in your workshop. Tool compatibility, material selection, and aesthetic requirements all intersect at the screw head, and getting that intersection right is one of the highest-leverage skills in woodworking. For sourcing high-quality fasteners for woodworking, working with a manufacturer that controls recess geometry and coating quality from raw material through final packaging makes a measurable difference in your results.

Frequently Asked Questions (FAQs)
What is the best screw head for hidden fasteners?
Flat head (countersunk) screws with Torx drive are the strongest choice for hidden fastener joints. The countersunk cone seats flush or below the surface, and the hole can be plugged with a matching wood dowel for complete concealment. For pocket hole joinery, washer-head screws driven from the back of the workpiece achieve total invisibility from the show face. In both cases, the key is matching the countersink angle — 82 degrees for North American standard screws — to the screw’s conical bearing surface, so the head seats cleanly without crushing surrounding wood fibers.
How do I prevent cam-out when using Torx vs Phillips?
With Torx, cam-out is nearly eliminated by the drive’s geometry — the six-pointed star transfers torque through perpendicular contact surfaces with almost zero ejection force. The main prevention step is using the exact correct T-size bit (e.g., T20 for #8–#10 screws). With Phillips, cam-out is inherent in the design, but you can reduce it by applying firm downward pressure while driving (known as “axial load”), setting your drill’s clutch to disengage just before the screw seats, and always using a sharp bit — a worn PH2 bit cams out at roughly 40% lower torque than a new one. If cam-out is consistently problematic, switching to Torx-drive screws is the most effective permanent fix. Manufacturers like prendedor de príncipe offer the same screw gauges in both Phillips and Torx configurations, making the transition straightforward.
Should I use stainless steel screws for outdoor projects?
For fully exposed outdoor projects — decks, fences, garden structures — stainless steel (304 grade minimum) or ceramic-coated screws are the only reliable long-term choices. Standard zinc-plated screws begin corroding within 1–3 seasons in direct weather exposure, and the corrosion accelerates dramatically in ACQ pressure-treated lumber, which contains copper compounds that attack zinc. A comparison by Marsh Fasteners confirms that stainless steel outlasts galvanized by a factor of 5–10× in coastal or high-moisture environments. For projects within 5 miles of saltwater, upgrade to 316 stainless steel, which resists chloride-induced pitting that eventually degrades even 304 grade.
How do I determine the right screw length for a given join?
The standard rule is that at least two-thirds of the screw’s threaded length should engage the receiving (bottom) piece. For a face-to-face joint of two 3/4-inch boards, this means a 1-1/4-inch to 1-1/2-inch screw. For decking, use a screw that’s 3× the thickness of the board being fastened (1-inch decking = 3-inch screw). When drill-through is a concern — for example, fastening a panel to a thin rail — the screw tip should stop at least 1/8 inch from the far face to avoid a visible bump. Always measure your actual material thickness rather than assuming nominal dimensions: a “1-inch” board is typically 3/4 inch, and a “2×4” is actually 1.5 × 3.5 inches.
Can I reuse screws from old projects safely?
It depends on the screw’s condition and the original application. Stainless steel screws removed from indoor furniture — where there’s no corrosion or thread damage — can be reused without concern. Carbon steel screws with visible rust, stripped recesses, bent shanks, or damaged threads should always be discarded. Even if a rusty screw looks structurally sound, the rust has reduced the cross-sectional area of the threads, lowering holding power by an unpredictable amount. Screws removed from ACQ-treated lumber often show accelerated corrosion at the wood-contact line and should never be reused. When in doubt, the cost of a new screw (typically $0.03–$0.15) is trivial compared to the cost of a failed joint.
What screw head type works best for MDF and particleboard?
Flat head chipboard screws with Pozidriv (PZ2) or Torx (T20) drive are the industry standard for MDF and particleboard. These screws feature a single-lead coarse thread specifically designed to grip the resin-bonded fiber structure of engineered wood panels. The flat head seats flush in a countersunk hole without the splitting risk that plagues solid wood. Avoid over-torquing in MDF — the material has no grain structure to resist pull-through, so once the fibers around the screw head crush, holding power drops to near zero. Pre-drill every hole, and set your drill clutch to a low torque setting. Prince Fastener’s MDF screw guide provides specific torque recommendations by panel density.
Is Pozidriv really better than Phillips for woodworking?
Yes, by a significant margin. Pozidriv’s eight-surface contact zone raises the cam-out torque threshold by 60–80% over Phillips, which translates directly to fewer stripped recesses, longer bit life, and more consistent screw seating. In a detailed comparison by Prince Fastener, a PZ2 Pozidriv recess withstands 6–8 Nm in hardwood versus 3–4.5 Nm for PH2 Phillips. The catch is that Pozidriv requires PZ-specific bits — using a Phillips bit in a Pozidriv screw reduces contact area by half and negates the entire advantage. If your shop already stocks Pozidriv bits and your screws are PZ-marked, you’ll see a meaningful improvement over Phillips in every hardwood and MDF application.
What pilot hole size should I use for hardwood vs softwood?
Pilot hole diameter should match the screw’s root diameter (the shank minus the threads) in hardwood and be approximately 15% smaller in softwood. For a #8 screw, that means an 11/64-inch tapered bit in hardwood and a 5/32-inch tapered bit in softwood. Always drill a separate “clearance hole” in the top piece — sized to the screw’s full shank diameter — so the threads don’t grip the top board and prevent the joint from pulling tight. For a complete chart covering sizes #2 through #24, the Bolt Depot pilot hole reference is the most widely used free resource in the woodworking community.