Self-locking castellated nuts sit in a niche that many engineers and maintenance teams quietly rely on: they combine a castellated (slotted) geometry that can be mechanically secured with a cotter pin or lockwire, plus a self-locking feature that adds prevailing torque. In plain terms, you get a fastener strategy that is harder to back off under vibration and easier to visually verify after installation—two qualities that matter when a single loose joint can cascade into downtime, warranty claims, or safety incidents.

In real-world modern engineering—especially in transportation, rotating machinery, and high-cycle assemblies—the “best” nut is rarely the one with the most features. The best nut is the one whose locking method matches the failure mode you actually face: vibration loosening, thermal cycling, joint settlement, human assembly error, or repeated service access. Self-locking castellated nuts are often chosen because their locking is not solely dependent on friction; once pinned or wired correctly, the nut has a positive retention mechanism that helps prevent complete loss of clamp integrity even if conditions degrade.
This article delivers a practical, comparison-driven view of self-locking castellated nuts: how they work, where they outperform common alternatives, and where they introduce trade-offs you should plan for. We’ll focus on what matters to engineers and buyers: reliability under dynamic load, installation repeatability, inspection visibility, and lifecycle cost—rather than just catalog descriptions.
From a credibility standpoint, it’s also important to note that safety-critical guidance exists on how and when self-locking nuts should be used. For example, FAA guidance emphasizes that self-locking nuts alone are not appropriate when joint movement could cause relative rotation against the bearing surface; in those situations, a non-friction locking device should be used in addition. That same guidance explicitly recognizes the suitability of self-locking castellated nuts with cotter pins or lockwire as a compliant approach in many systems. [Source](https://www.faa.gov/documentLibrary/media/Advisory_Circular/AC_23_607-1.pdf)
Throughout the guide, we’ll share selection heuristics you can apply immediately—whether you’re specifying parts for new designs or troubleshooting recurring loosening in the field. If you’re sourcing these fasteners at scale, we’ll also highlight procurement-friendly decision points that reduce the risk of misapplication. For reference, our brand プリンスファスナー supports customers who need consistent supply and application-focused guidance; you can start at
www.princefastener.com.
Direct Summary: Main Pros & Cons
Main pros: strong vibration resistance (especially when combined with a cotter pin/lockwire), enhanced safety through positive retention, easier visual inspection, and reliable behavior under dynamic loads because the locking strategy is not purely friction-based.
Main cons: higher unit cost than standard nuts, potential surface or thread wear due to prevailing torque features, and application limits (space constraints for cotter pins/wire, or cases where rotation/relative movement makes a self-locking-only approach unsuitable unless a secondary device is used). [Source](https://www.faa.gov/documentLibrary/media/Advisory_Circular/AC_23_607-1.pdf)
How to Use This Article
- If you design joints: focus on the Basics and Pros sections to map locking mechanisms to failure modes.
- If you maintain equipment: prioritize the installation/inspection notes and safety guidance.
- If you buy fasteners: use the process and checklists to avoid spec mismatch and rework.
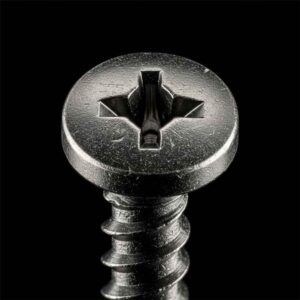
Self-Locking Castellated Nut Basics
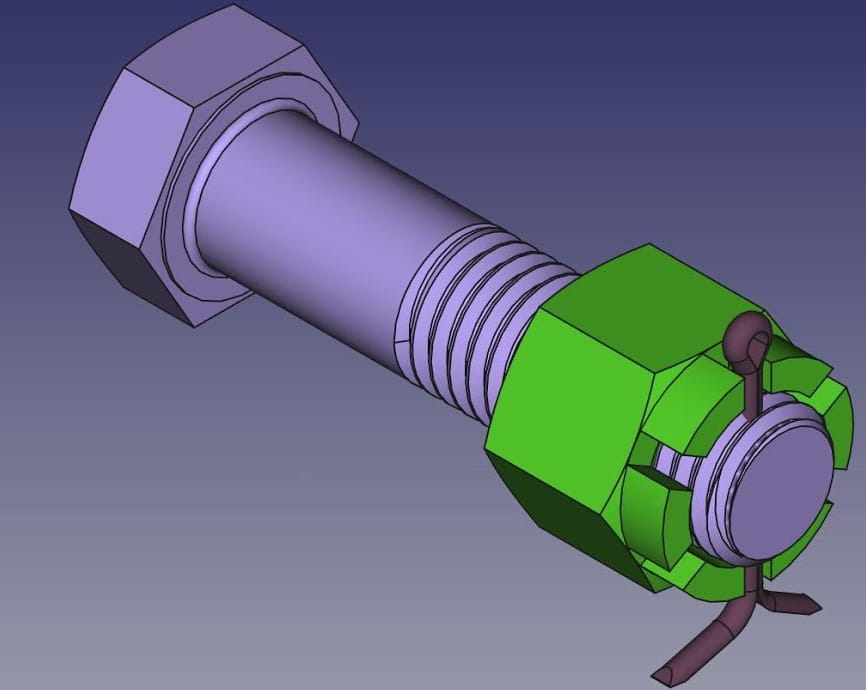
A castellated nut (often called a “castle nut”) is a slotted nut designed to align with a drilled hole in the bolt or stud so a cotter pin can pass through and prevent the nut from rotating loose. A self-locking castellated nut adds a prevailing-torque feature—typically a deformed thread section, an integrated locking collar, or (in some standards) a non-metallic locking element. The result is a hybrid locking approach: friction-based resistance to rotation plus a positive mechanical stop when used with a cotter pin or lockwire.
In modern engineering terms, it’s useful to think of this nut as part of a “locking system,” not a single part. The joint integrity depends on: bolt/stud quality, correct torque, correct alignment to the cotter hole, correct pin/wire installation, and the joint’s real duty cycle (vibration spectrum, temperature range, lubrication, and service access frequency).
主な特徴
1) Slots (Castellations) for Positive Retention
The defining geometry is the set of slots at the top of the nut. When the nut is tightened, one slot is aligned with the cross-drilled hole in the bolt/stud. A cotter pin (or lockwire in some industries) is inserted through the hole, and the ends are bent to keep the pin from backing out. This creates a physical barrier to nut rotation, making it highly inspection-friendly: if the pin is present and correctly bent, the locking state is visually obvious.
2) Prevailing Torque (Self-Locking Action)
The self-locking aspect adds frictional resistance so the nut does not rotate freely even before pinning. This matters in assemblies where micro-motions, vibration, or handling can cause a standard castellated nut to “walk” slightly before the cotter pin is installed. It also matters if the cotter pin experiences slight deformation or if the joint sees repeated small disturbances: prevailing torque helps reduce the tendency to move toward the loosening direction.
3) Materials and Surface Treatments
Self-locking castellated nuts are commonly specified in higher-performance material classes and may be paired with corrosion-resistant finishes depending on environment. The key engineering point is that the locking feature (especially if it is a deformed thread section) can change how the nut wears over repeated installations, and it can influence torque-tension relationships. If you’re standardizing across plants or suppliers, it’s worth controlling both material and finish so torque behavior stays consistent lot-to-lot.
4) Inspection & Human-Factor Advantages
In safety-sensitive contexts, a big advantage is that a pin/wire is a straightforward inspection cue. Many other lock-nut strategies require a technician to trust that “it was torqued correctly” or that the insert is still effective. A cotter pin provides a strong visual confirmation that the joint has a secondary retention device.
How the Locking Mechanism Works
Step-by-step locking sequence (typical)
- Tighten the nut to the specified torque (or to a condition such as aligning slots to a drilled hole, per procedure).
- Align the nearest slot with the bolt/stud cross-hole—without backing off excessively.
- Insert a cotter pin through the hole and the nut slots.
- Bend the pin legs back (or follow lockwire procedure) so the pin cannot slip out.
- Perform a final inspection: correct pin seating and bends, no interference, and adequate thread engagement.
Important safety note on “self-locking alone”
FAA guidance states that self-locking nuts alone should not be used when movement of the joint may result in motion of the nut or bolt head relative to the surface against which it is bearing; in those cases, a non-friction locking device should be used in addition. It also notes that self-locking castellated nuts with cotter pins or lockwire may be used in any system—highlighting the value of pairing prevailing torque with positive retention. [Source](https://www.faa.gov/documentLibrary/media/Advisory_Circular/AC_23_607-1.pdf)
Installation visual (YouTube)
For a quick visual refresher of castle nut + cotter pin installation:
Video source: Albany County Fasteners – “Castle Nuts – How to Install or Fit a Cotter Pin and Slotted Nut | Fasteners 101”. [Source](https://www.youtube.com/watch?v=5DqM0RNLQZ8)
Self-Locking Castellated Nut Pros
The real value of a self-locking castellated nut is not that it’s “stronger” in a generic sense; it’s that it provides multiple layers of resistance against loosening and loss. In modern engineering, loosening isn’t a single phenomenon—it can be caused by transverse vibration, embedding/settlement, thermal cycling, relaxation, or maintenance error. The “pros” below are best understood as ways this nut type reduces the probability of the worst outcomes: unexpected rotation, loss of clamp load, and complete nut departure.
耐振動性
Why this design performs well in vibration
- Prevailing torque increases frictional resistance to rotation, reducing sensitivity to small disturbances.
- Cotter pin/lockwire acts as a physical stop that prevents full rotation and nut loss even if friction is compromised.
FAA guidance underscores the value of adding a non-friction locking device when conditions could allow motion between bearing surfaces—and explicitly notes that self-locking castellated nuts with cotter pins or lockwire may be used broadly. [Source](https://www.faa.gov/documentLibrary/media/Advisory_Circular/AC_23_607-1.pdf)
Practical design tip: treat pinning as the primary lock
In many assemblies, the pin is your primary safeguard against nut departure, while prevailing torque is a stabilizer that reduces how often the joint tries to walk toward loosening. That combination can reduce maintenance checks, especially where vibration is persistent but not extreme.
Enhanced Safety
Positive retention & predictable failure behavior
A key advantage is that the cotter pin/lockwire provides a deterministic mechanical block. That means your system is less dependent on “perfect torque” and more tolerant of real-world variability: torque scatter, lubrication differences, or slight embedment after initial run-in.
FAA guidance is clear that self-locking nuts alone should not be used where joint movement may create relative motion; adding a non-friction locking device improves safety margin. [Source](https://www.faa.gov/documentLibrary/media/Advisory_Circular/AC_23_607-1.pdf)
Inspection friendliness (human factors)
A properly installed cotter pin is a strong, simple signal. This reduces reliance on paperwork alone and helps catch assembly misses early.
Easier Installation
Repeatability and training benefits
The end state is observable: align slots, insert pin, bend legs. Teams can train to a consistent visual standard, reducing variation across shifts and sites.
Sourcing support matters at scale
If you’re standardizing these nuts across product lines, supplier consistency becomes part of “ease.” A vendor who can hold consistent prevailing torque behavior, material certification, and finish control reduces installation surprises. Prince Fastener supports engineers and buyers who need predictable fastening performance and consistent supply; start at:
www.princefastener.com.

Reliability in Dynamic Loads
Dynamic loads introduce changing stresses, which can encourage gradual loosening if the joint experiences micro-slip or changing friction conditions. A self-locking castellated nut provides redundancy: prevailing torque resists small motions, while the cotter pin/lockwire prevents catastrophic nut loss.
What to document in your spec sheet
- Torque procedure (torque-to-value vs torque-to-align-slot).
- Allowed alignment method (tighten slightly; avoid backing off).
- Cotter pin spec and bending method.
- Inspection criteria (pin seated, legs bent, no interference).
Quick checklist (field-friendly)
- Slots aligned without excessive back-off.
- Cotter pin fully seated through hole and slots.
- Pin legs bent to prevent migration and minimize snagging.
- Adequate thread engagement; no interference with moving parts.
Installation Guide
A self-locking castellated nut is only as reliable as its installation. In practice, many “castle nut failures” are installation failures: the joint is not seated, torque is applied incorrectly, the cotter pin hole ends up mis-positioned due to missing washers or wrong parts, or the nut is backed off to chase alignment. The goal is not to add steps—it’s to remove ambiguity so technicians consistently land the joint in a known-good state.
The most important mindset shift is to treat the cotter pin as a safety device that completes the fastening system. The nut’s self-locking feature (prevailing torque) is helpful, but it should not be used as an excuse to “skip the pin” in applications that require positive retention.
Tools & Materials Checklist
- Calibrated torque wrench (avoid impact guns for final torque)
- Correct cotter pin size/material for the application
- Needle-nose pliers and side cutters
- Specified washer (if the joint design calls for it)
- Cleaning supplies for contaminated threads
Step-by-Step Installation Procedure
Step 1: Verify stud/bolt fit before tightening
Before tightening, confirm the stud is properly seated and there is no looseness, which may indicate a damaged receiving hole or incorrect parts and could lead to breakage or other damage. [Source](https://www.moogparts.com/technical/bulletins/tech-tips/How-to-Install-a-Cotter-Pin-on-a-Castle-Nut.html)
Step 2: Install the washer if specified
If a washer is provided, place it under the nut before installation. Failing to use the washer can cause the cotter pin hole to sit below the castle nut slots, preventing correct pinning. [Source](https://www.moogparts.com/technical/bulletins/tech-tips/How-to-Install-a-Cotter-Pin-on-a-Castle-Nut.html)
Step 3: Torque the nut to the manufacturer’s specification
Torque the castle nut to the recommended specification using a torque wrench; MOOG advises not to use an impact gun for final tightening. [Source](https://www.moogparts.com/technical/bulletins/tech-tips/How-to-Install-a-Cotter-Pin-on-a-Castle-Nut.html)
Step 4: Align slots with the cotter pin hole (tighten slightly if needed)
If necessary, tighten the nut slightly to improve alignment; never back the nut off. If the cotter hole is too high or too low, it may indicate poor fit or incorrect parts rather than a simple alignment issue. [Source](https://www.moogparts.com/technical/bulletins/tech-tips/How-to-Install-a-Cotter-Pin-on-a-Castle-Nut.html)
Step 5: Insert the cotter pin fully, then secure it
Insert the cotter pin completely and bend the legs back to prevent it from slipping out. The cotter pin provides additional assurance that the nut will not back off while in service. [Source](https://www.moogparts.com/technical/bulletins/tech-tips/How-to-Install-a-Cotter-Pin-on-a-Castle-Nut.html)
Common Installation Mistakes (and how to avoid them)
| 間違い | Why it’s risky | Better practice |
|---|---|---|
| Backing off the nut to align the slot | Can reduce clamp load and increase loosening risk | Tighten slightly to align; if alignment is impossible, diagnose fit/parts |
| Missing washer (when specified) | Cotter hole may sit below castellations | Install washer per design; confirm nut sits at correct elevation |
| Using an impact gun for final torque | Over-torque, thread damage, clamp load scatter | Use a torque wrench for final tightening |
| Cotter pin not fully inserted or not secured | Pin can migrate out; nut can rotate | Insert fully; bend legs back to lock in place |
Quick Video: Proper Cotter Pin Installation
This short MOOG video demonstrates correct cotter pin technique and why it matters:
Video source: MOOG Parts – “Proper Cotter Pin Installation”. [Source](https://www.youtube.com/watch?v=QSfwTsrxP_c)
Sourcing Note
If you need repeatability at scale, consider controlling specifications and supplier consistency (prevailing torque behavior, materials, and finish). Prince Fastener supports engineers and buyers who need predictable fastening performance and consistent supply; start at
www.princefastener.com.
Maintenance & Troubleshooting
The maintenance advantage of self-locking castellated nuts is that you get a “two-signal” system: prevailing torque resists casual rotation, and the cotter pin provides a clear visual indicator that a secondary retention method is present. But a pinned nut can still be installed on a joint that is poorly seated, mismatched, or damaged—meaning the assembly might not loosen immediately, but could fail by fatigue, stud breakage, or accelerated wear.
The troubleshooting approach below prioritizes finding root cause rather than re-tightening. If a nut repeatedly “needs attention,” the problem is usually not “the nut”—it’s a mismatch between load, fit, torque procedure, and inspection discipline.
Routine Inspection Checklist (fast, practical)
- Cotter pin: fully inserted; legs bent back to prevent slip-out. [Source](https://www.moogparts.com/technical/bulletins/tech-tips/How-to-Install-a-Cotter-Pin-on-a-Castle-Nut.html)
- Alignment: achieved by tightening slightly (not backing off). [Source](https://www.moogparts.com/technical/bulletins/tech-tips/How-to-Install-a-Cotter-Pin-on-a-Castle-Nut.html)
- Washer usage (if specified): missing washer can misplace cotter hole relative to slots. [Source](https://www.moogparts.com/technical/bulletins/tech-tips/How-to-Install-a-Cotter-Pin-on-a-Castle-Nut.html)
- Movement indicators: fretting dust, shiny witness marks, abnormal wear
- Thread condition: galling, deformation, contamination
Symptom-to-Cause Troubleshooting Table
| Symptom | Likely cause | What to do next |
|---|---|---|
| Cotter hole is below the castellations | Washer omitted or wrong stack height | Confirm washer requirement and part fit; correct the stack-up |
| Alignment requires backing off | Poor fit, wrong part, seated height issue | Do not back off; diagnose fit/parts and re-install correctly |
| Pin breaks or looks fatigued | Interference, improper bending, or joint movement | Inspect rubbing; verify correct pin spec; reduce joint movement |
| Nut feels “easy” to turn during reassembly | Prevailing torque worn, threads damaged, or wrong nut type | Replace nut; inspect bolt/stud threads; standardize spec |
Reuse & Replacement Policy (shop-floor friendly)
Many teams treat cotter pins as single-use safety devices because bending/unbending work-hardens the material. Meanwhile, self-locking features can lose effectiveness over repeated cycles depending on design and installation practices. For safety-critical cases, follow governing standards and internal maintenance manuals; where no controlling standard exists, a conservative policy is: replace the cotter pin every time, and replace the nut whenever prevailing torque is suspect or threads show damage.
Case Studies
The following case studies are representative engineering patterns rather than confidential customer stories. The value is in the decision logic: what problem was being solved, why a self-locking castellated nut was selected (or rejected), and what the team learned about installation, inspection, and lifecycle cost.
Case Study 1: Field Loosening Under Vibration (Inspection-Driven Fix)
Context
A maintenance team reported recurring “loose hardware” findings during routine checks on a vibration-prone assembly. The existing hardware relied on friction-based locking alone, and the shop suspected inconsistent torque application across shifts.
Change implemented
The team switched to a configuration where the nut could be positively retained with a cotter pin and established a simple inspection standard: “pin present, fully seated, legs bent back.” This reduced ambiguity in inspection and helped catch incomplete work early.
Key lesson
When you cannot guarantee torque consistency in the field, adding a retention method that is visually verifiable can reduce risk. This aligns with FAA guidance emphasizing that self-locking nuts alone should not be used when joint movement could cause relative motion, and recognizing self-locking castellated nuts with cotter pins or lockwire as acceptable in many systems. [Source](https://www.faa.gov/documentLibrary/media/Advisory_Circular/AC_23_607-1.pdf)
Case Study 2: “Impossible Alignment” Revealed Wrong Stack-Up
Context
A technician consistently found that the cotter pin hole sat below the nut slots after torquing. The shortcut temptation was to omit torque, back the nut off, or force the pin.
Diagnosis
The root cause was an incorrect stack-up: a required washer was omitted, moving the nut down relative to the cotter hole. MOOG specifically warns that failing to use the washer can cause the cotter pin hole to be below the castle nut slots. [Source](https://www.moogparts.com/technical/bulletins/tech-tips/How-to-Install-a-Cotter-Pin-on-a-Castle-Nut.html)
Fix
Reinstating the washer restored correct alignment without compromising torque. The team also adopted the “tighten slightly to align—never back off” rule for slot alignment. [Source](https://www.moogparts.com/technical/bulletins/tech-tips/How-to-Install-a-Cotter-Pin-on-a-Castle-Nut.html)
Case Study 3: Training Improvement Using a 60-Second Video Standard
Context
An organization struggled with inconsistent cotter pin bending and occasional missing pins. The technical process was simple; execution was not.
Change implemented
The team embedded a short “gold standard” video into the digital work instruction and required techs to pass a quick visual checklist. MOOG’s short installation video became the reference artifact for training and audits. [Source](https://www.youtube.com/watch?v=QSfwTsrxP_c)
Where Prince Fastener Fits (practical)
Case studies like these often end with the same operational requirement: stable specs and consistent supply. If you’re scaling up production or standardizing maintenance kits, you want the same nut behavior lot after lot, plus clear application guidance. Prince Fastener can support those needs; start at
www.princefastener.com.
よくあるご質問
1) Should you ever loosen (back off) a castellated nut to align the cotter pin hole?
As a general best practice, no. MOOG’s guidance is explicit: if necessary, tighten slightly to improve alignment; never back the nut off to align the cotter hole. If alignment is not achievable, it may indicate poor fit or incorrect parts. [Source](https://www.moogparts.com/technical/bulletins/tech-tips/How-to-Install-a-Cotter-Pin-on-a-Castle-Nut.html)
2) Do you always need a washer under a castellated nut?
Only if the design specifies it—but if a washer is provided, it should be used. Skipping it can place the cotter hole below the nut slots and prevent proper pinning. [Source](https://www.moogparts.com/technical/bulletins/tech-tips/How-to-Install-a-Cotter-Pin-on-a-Castle-Nut.html)
3) Is a cotter pin really necessary if the nut is self-locking?
In many safety- or vibration-sensitive applications, the cotter pin (or lockwire) is the positive retention element that prevents nut loss even if friction-based locking degrades. FAA guidance highlights that self-locking nuts alone should not be used when joint movement could cause relative motion, and recognizes self-locking castellated nuts with cotter pins or lockwire as an acceptable approach in many systems. [Source](https://www.faa.gov/documentLibrary/media/Advisory_Circular/AC_23_607-1.pdf)
4) Can you use an impact gun to tighten a castellated nut?
For final torque, it’s not recommended. MOOG advises using a torque wrench and specifically says don’t use an impact gun for final tightening. [Source](https://www.moogparts.com/technical/bulletins/tech-tips/How-to-Install-a-Cotter-Pin-on-a-Castle-Nut.html)
5) What does it mean if the cotter pin hole is too high or too low after torque?
It may indicate the stud has a poor fit in the receiving feature or that the part is incorrect for the application (and/or washer/stack-up issues). MOOG flags hole position as a potential indicator of deeper fitment problems. [Source](https://www.moogparts.com/technical/bulletins/tech-tips/How-to-Install-a-Cotter-Pin-on-a-Castle-Nut.html)
6) Why do some industries prefer lockwire instead of cotter pins?
Lockwire can serve as a positive locking method where geometry and standards support it. FAA guidance references cotter pins or lockwire as non-friction locking devices used with self-locking castellated nuts in many systems. [Source](https://www.faa.gov/documentLibrary/media/Advisory_Circular/AC_23_607-1.pdf)
7) What’s the simplest way to train technicians on correct cotter pin installation?
Use a short, consistent visual reference and a checklist. MOOG provides both written technique (torque to spec, align slots, insert pin fully, bend legs back) and a short video demonstrating proper installation. [Source](https://www.youtube.com/watch?v=QSfwTsrxP_c)
8) Where can I source consistent self-locking castellated nuts for production or maintenance kits?
Start with suppliers that support consistent specifications and application guidance. For Prince Fastener resources and sourcing conversations, begin at
www.princefastener.com.