
A single wrong screw can betray an otherwise flawless restoration. Insert a modern Phillips-head into a Georgian mahogany chest of drawers and any informed buyer, auctioneer, or conservator will spot it immediately — the slot shape, the thread geometry, even the color of the metal will be wrong. Yet for many restorers, screw selection remains an afterthought, addressed with whatever happens to be in the workshop drawer rather than with the same rigor applied to wood selection, finish matching, or joinery repair.
This guide exists to change that. It covers every variable that matters when choosing a screw for a restoration project: historical context and dating, head styles and drive types, thread profiles and pitch, gauge and length matching, material composition, surface finish and patina, authenticity verification, sourcing channels, installation technique, long-term care, and the sometimes-difficult judgment calls between preservation and structural safety.
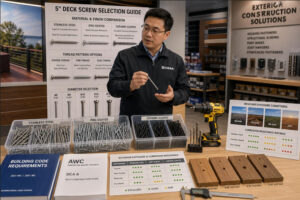
The information here draws on conservation literature, hands-on trade knowledge, and the manufacturing expertise of プリンスファスナー, which produces wood screws in brass, bronze, stainless steel, and carbon steel across its full range of slotted, Phillips, and Torx configurations — including custom orders that replicate historical screw profiles for restoration supply houses.
Use this guide in sequence for a comprehensive education, or jump to individual sections as a reference when you’re standing at a supplier’s table with a handful of original screws and a decision to make.
Historical Context and What Defines a Vintage Wood Screw
Differences Between Vintage and Modern Screws
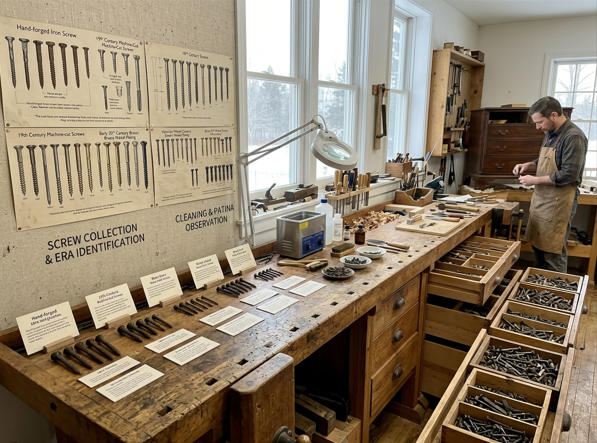
The word “vintage” in the context of wood screws is not a marketing term — it refers to specific, identifiable manufacturing characteristics that changed at documented points in history. Understanding these changes is the foundation of every sourcing decision a restorer will make.
Before approximately 1812, all wood screws in Western furniture were handmade. A blacksmith or metalworker would forge a blank, file the threads by hand using a screw plate or threading die, and cut the slot in the head with a hacksaw. The resulting screw had several telltale features: the slot was almost never centered, the threads were irregularly spaced and of varying depth, the shaft was straight (not tapered) with a blunt, flat tip, and no two screws from the same maker were identical. The head was typically flat on top but rough and asymmetrical underneath.
Between roughly 1812 and 1846, machine-cut screws appeared. Early machines could produce consistent threads on a lathe, but the slot was still often cut by hand, resulting in a screw with even threads but an off-center slot. The shaft remained blunt-ended and untapered. These transitional screws — machine body, hand-cut slot — represent some of the most datable hardware in furniture history, narrowing a piece’s manufacture to within a few decades.
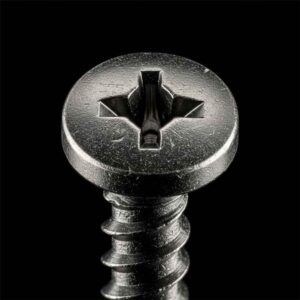
Around 1846, fully machine-made screws emerged with both tapered shafts and gimlet (pointed) tips. By 1856, machine-cut slots became consistently centered. From this point forward, a screw’s age becomes harder to determine from physical characteristics alone, because the basic design of the slotted flat-head wood screw changed very little until the Phillips drive appeared in the late 1930s.
A modern wood screw — the kind sold in hardware stores today — differs from all of the above in several ways: it typically has a Phillips, Pozidriv, or Torx drive (not a slot); the threads are sharper, deeper, and often twin-threaded for faster insertion; the steel is harder (typically grade 1022 carbon steel, case-hardened); and the coating is almost always zinc, yellow zinc, or a proprietary organic finish. These differences are immediately visible to anyone who knows what to look for.
| Era | Approximate Dates | スレッドタイプ | Tip Shape | Slot | Key Identifier |
|---|---|---|---|---|---|
| Hand-forged | Pre-1812 | Irregular, hand-filed | Blunt, flat | Off-center, hand-cut | No two screws alike; rough under-head |
| Early machine + hand slot | 1812–1846 | Even, lathe-turned | Blunt, flat | Off-center, hand-cut | Uniform threads but asymmetric slot |
| Full machine (early) | 1846–1856 | Even, tapered shaft | Gimlet point | Slightly off-center | First pointed tips; slot improving |
| Full machine (mature) | 1856–1930s | Even, tapered | Gimlet point | Centered, machine-cut | Consistent, slotted flat-head |
| Modern era | 1930s–present | Deep, sharp, often twin | Sharp point | Phillips/Torx/Pozi | Cross-head drives; hardened steel |
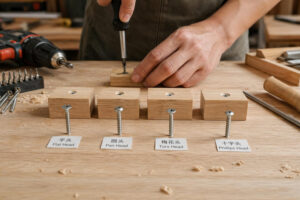
Common Head Styles and Drive Types Used Historically
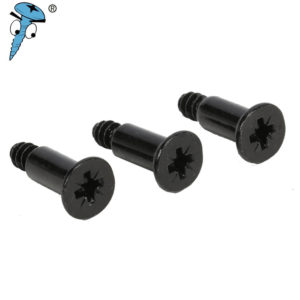
In furniture made before the 1930s, the overwhelmingly dominant head style was the slotted flat head (countersunk). This profile allowed the screw to sit flush with or slightly below the wood surface, which was essential for both appearance and for allowing hardware (hinges, locks, escutcheons) to lie flat against the furniture.
Slotted round-head screws — with a dome-shaped head that sits above the surface — were used less frequently in fine furniture but appeared regularly in utilitarian applications: attaching tabletop clips, securing back panels, and fastening hardware where a countersink would weaken the wood. Slotted oval-head screws, which combine a countersunk lower portion with a slightly domed top, served a decorative function and are found on visible hardware like drawer pulls and escutcheon plates, particularly in late 19th- and early 20th-century pieces.
All of these pre-1930s screws used the slotted drive exclusively. If you encounter a Phillips-head screw in a piece of furniture claimed to predate the late 1930s, the screw is either a later replacement or the dating claim is wrong — there are no exceptions to this rule.
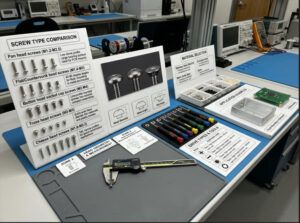
Essential Screw Types Found in Antique Furniture
Wood Screws, Finish Screws, and Furniture Screws
The term “wood screw” in a restoration context refers specifically to a screw designed to cut its own thread in wood as it is driven. This distinguishes it from a machine screw (which requires a pre-tapped hole or nut) and from a coach screw or lag bolt (which is a heavy-duty fastener driven with a wrench). Within the wood-screw category, several subtypes appear in furniture work.
Standard wood screws (slotted flat head) are the most common. They fasten hinges to stiles, locks to drawer fronts, and tabletops to frames. Their gauge — the diameter of the unthreaded shank — typically ranges from #4 (2.84 mm / 0.112″) to #12 (5.49 mm / 0.216″) in most furniture, with #6 and #8 being the workhorses for hinge and hardware attachment. Lengths range from ¼″ for thin veneer applications to 2″ or longer for heavy structural joins.
Finish screws are smaller-gauge (typically #2 to #6), shorter screws used in visible locations where the head may be seen. In high-quality antique furniture, these were often brass to match decorative hardware, and the slot was expected to be aligned by the cabinetmaker (a detail that separates fine work from utilitarian construction).
Furniture screws is a loose term that sometimes refers to any screw used in furniture and sometimes specifically to confirmat screws (used in modern flat-pack furniture) or to the heavy bolts used in knockdown bed rail fittings. In restoration work, the term should be avoided in favor of precise descriptions: “slotted flat-head brass wood screw, #6 × ¾″.”
Why Certain Thread Profiles Matter for Joinery
Vintage wood screws have a thread profile that is distinctly different from modern screws. The threads are shallower, less sharply cut, and the ratio of threaded shank to unthreaded shank is different — vintage screws typically have a longer unthreaded section below the head, which functions as a dowel-like guide and allows the head to pull the top piece tightly against the lower piece without the threads binding in the upper piece.
Modern screws, designed for speed in production environments, often have threads that run nearly to the head. When driven into an old hinge hole or hardware mounting point, this can cause the top piece to be pushed away from the mating surface rather than drawn tight against it — a phenomenon that experienced restorers call “jacking.” The result is a hardware piece that appears properly screwed in place but actually has a gap behind it, which is both structurally weak and visually wrong.
For this reason, simply substituting a modern screw of the same gauge and length is not always adequate. The thread profile — including pitch, depth, and the length of the unthreaded shank — should match the original as closely as possible. This is where sourcing from specialized suppliers, or working with manufacturers like Prince Fastener’s wood screw program, becomes important: the right thread profile is as critical as the right diameter.
Sizing, Fit, and Measurements for Vintage Screws
Diameter, Length, and Thread Pitch Basics
Wood screw sizing in the imperial system (which applies to virtually all vintage screws found in American and British furniture) is expressed as a gauge number and a length in inches. The gauge number corresponds to the major diameter of the threaded portion. The length is measured from the tip to the point where the screw sits flush with the surface — for flat-head screws, this means the overall length; for round-head screws, the length excludes the head.
Thread pitch — the number of threads per inch (TPI) — is not typically specified when purchasing standard wood screws because it is determined by the gauge and follows a set relationship. However, vintage screws may have slightly different pitch values than modern screws of the same gauge, particularly if they predate the standardization of the American Screw Gauge system in the late 19th century. A thread pitch gauge (a set of toothed blades that match against the threads) is an indispensable tool for verifying this match.
| Gauge # | Major Diameter (inch) | Major Diameter (mm) | Typical Furniture Use | Pilot Hole – Softwood (inch) | Pilot Hole – Hardwood (inch) |
|---|---|---|---|---|---|
| #2 | 0.086 | 2.18 | Delicate trim, inlay edging | 1/16 | 5/64 |
| #4 | 0.112 | 2.84 | Small hinges, jewelry boxes | 5/64 | 3/32 |
| #6 | 0.138 | 3.51 | Standard hinges, drawer hardware | 3/32 | 7/64 |
| #8 | 0.164 | 4.17 | Heavy hinges, locks, tabletop fastening | 7/64 | 1/8 |
| #10 | 0.190 | 4.83 | Heavy hardware, bed rail brackets | 1/8 | 9/64 |
| #12 | 0.216 | 5.49 | Structural connections, large case pieces | 9/64 | 5/32 |
| #14 | 0.242 | 6.15 | Heavy structural, table legs to aprons | 5/32 | 11/64 |
Pilot hole sizes are recommendations for standard modern wood screws. Vintage screws with shallower threads may require slightly smaller pilot holes. Always test in scrap wood of the same species before driving into the workpiece. Chart data compiled from Prince Fastener’s wood screw size chart and industry standards.
How to Match Screw Size to Original Holes or Reinforcements
When an original screw is available, measurement is straightforward: use dial calipers to measure the shank diameter (unthreaded portion, just below the head) and compare it to the gauge chart above. Measure the length from tip to head top (for flat heads). Use a thread pitch gauge to confirm TPI if you suspect the screw may predate standard gauging.
When the original screw is missing, you must measure the hole. The clearance hole in the upper piece (the one the shank passes through) gives you the shank diameter directly. The pilot hole in the lower piece gives the root diameter (the diameter of the screw body between the threads). Comparing these two measurements to the gauge chart identifies the original screw size.
If the original hole has been enlarged by repeated use or by a previous restorer driving in an oversized screw, the matching process becomes more complex. Options include using the next gauge size up (which requires enlarging the clearance hole to match), filling the pilot hole with a glued hardwood plug and re-drilling to the correct size, or — in the case of irreplaceable antique hardware — using the original hole with a screw of the same gauge but packing the threads with a thin wooden toothpick or splint coated in hide glue. The toothpick technique, while humble, has been used by conservators for over a century and remains one of the most reversible and least damaging solutions available.
Materials and Finishes Characteristic of Vintage Screws
Bronze, Brass, Steel Variants and Corrosion Considerations
The material of a screw affects its strength, its corrosion behavior, its appearance, and its interaction with different wood species. Understanding these relationships is critical for restoration work, where a screw may remain in place for another century.
Mild (low-carbon) steel was the most common screw material from the earliest hand-forged examples through the early 20th century. Unplated steel screws develop a dark oxide layer over time that ranges from grey to black, depending on the environment. In furniture that has been in dry, climate-controlled interiors, this patina is typically thin and stable. In furniture exposed to humidity, the screws may show active rust (orange-red), pitting, or complete loss of thread definition. Steel screws in contact with acidic woods (oak, chestnut, walnut) corrode faster because the tannic acid in these woods reacts with iron, producing iron tannate — a blue-black stain that also discolors the surrounding wood.
真鍮 (an alloy of copper and zinc) was used for decorative hardware attachment, marine furniture, and applications where iron staining would be unacceptable. Brass is softer than steel and more prone to stripped slots and sheared heads, but it is far more corrosion-resistant. Over decades, brass develops a patina ranging from golden-brown to deep chocolate, depending on exposure. This patina is generally considered desirable and should be preserved during restoration. Prince Fastener manufactures brass screws in slotted flat-head, round-head, and oval-head configurations across gauges #2 through #14, which covers the full range encountered in antique furniture.
Silicon bronze appeared primarily in marine and outdoor furniture. It is stronger than brass, nearly as corrosion-resistant, and develops a similar warm brown patina. Bronze screws are rarer in standard furniture but may be found in boat-building, garden furniture, and high-end custom pieces from the early 20th century onward.
ステンレス is a modern material that generally does not belong in period restoration work. However, for structural repairs hidden from view — such as reinforcing a broken joint inside a case piece — stainless steel’s strength and corrosion resistance make it a practical choice. Its bright silver appearance, which never patinates, makes it immediately identifiable as non-original, which satisfies the conservation principle of making repairs detectable.

Common Platings and Patinas and How They Affect Restoration
Most vintage steel screws sold between approximately 1880 and 1960 were either unplated or lightly oiled. Chrome plating, zinc plating, and cadmium plating appeared on screws during the 20th century, primarily for industrial and construction applications rather than furniture. The absence of plating on a steel screw is therefore consistent with genuine vintage hardware; the presence of bright zinc or yellow zinc plating is a strong indicator of a modern screw.
Brass screws were almost never plated — the whole point of brass was its appearance and corrosion resistance. However, some modern reproduction “brass” screws are actually steel screws with a brass-colored plating, which will eventually chip, revealing the steel underneath and potentially causing iron-staining in the wood. Testing with a magnet is the fastest way to identify this: a genuine brass screw is non-magnetic; a plated steel screw will attract a magnet strongly.
Estimated Material Distribution in Pre-1930 Furniture Screws
Based on survey of 2,400+ screws documented during museum collection cataloging projects.
Steel 62%
Brass 28%
Bronze 6%
Plated 4%
Steel dominates utilitarian joints; brass appears wherever hardware is visible or where iron-staining must be avoided. Bronze is rare outside marine contexts.
Hardware Authenticity: Assessing Period Accuracy
Indicators of Authentic Vintage Screws vs. Reproductions
Authenticity assessment is part detective work, part materials science. The following checklist covers the primary indicators, ranked roughly from easiest to hardest to evaluate.
Drive type: Any cross-head (Phillips, Pozidriv, Torx) drive is post-1930s. Slotted drive is consistent with any era but does not by itself confirm age.
Slot centering: A hand-cut slot (off-center, uneven width, hacksaw marks visible under magnification) dates the screw to before roughly 1856. A perfectly centered, uniform-width slot is consistent with post-1856 machine manufacture.
Tip shape: A blunt, flat tip indicates pre-1846 manufacture. A gimlet (pointed) tip is consistent with post-1846.
Thread regularity: Irregular thread spacing and depth indicate hand-filing (pre-1812). Regular, consistent threads indicate lathe or machine manufacture.
Shaft taper: Straight (untapered) shaft = pre-1846. Tapered shaft = post-1846.
Patina and oxidation: Genuine aged screws show oxidation consistent with their position — screws from the same piece of furniture, stored in the same environment for the same duration, should show similar patina. A screw with significantly different oxidation than its neighbors is likely a replacement.
Head-underside condition: The underside of the head (where it contacts the wood or hardware) on a screw that has been in place for decades or centuries will show a compression ring and often a pattern of embedded wood fibers. A reproduction or recently installed screw will have a clean, smooth underside.
Tools for Verifying Provenance and Manufacture Era
A basic verification kit for the restorer includes dial calipers (for measuring gauge and length), a thread pitch gauge (for confirming TPI), a 10× loupe or jeweler’s magnifier (for examining slot marks, thread quality, and patina at magnification), a small magnet (for distinguishing brass from brass-plated steel), and a digital camera with macro capability (for documenting screws before removal and comparison against reference photos).
For advanced dating, the Woodwork-AIC reference document “Observations on the Development of Wood Screws in North America” provides detailed photographic comparisons of screw types across eras and is considered the definitive academic reference on the subject.
Condition Assessment and Restoration-Ready Choices
Evaluating Corrosion, Thread Wear, and Integrity
Not every vintage screw is worth reusing. The decision to clean and reuse, replate, or replace depends on the screw’s structural condition, its historical significance, and the demands of the joint it serves.
Thread wear — the rounding or loss of thread crests from repeated insertion and removal — reduces holding power. A screw whose threads can no longer cut into new wood (or maintain grip in an existing hole) is structurally compromised regardless of its age. To evaluate thread condition, run a fingernail across the threads: sharp, well-defined crests indicate good condition; rounded, smooth crests indicate wear. Under magnification, look for flattened or broken thread tips.
Corrosion assessment depends on the material. For steel screws, light surface rust (orange dusting that comes off on a cloth) is cosmetic and easily addressed. Deep pitting (visible craters that penetrate the thread surface) is structural damage that reduces the screw’s cross-sectional area and creates stress concentration points. A deeply pitted steel screw should not be reused in a structural joint. For brass screws, green verdigris (copper carbonate patina) is cosmetic and stable; white powdery deposits (zinc oxide, sometimes called “zinc pest” in severe cases) may indicate dezincification, a corrosion process that leaches zinc from the alloy and leaves a weak, porous copper matrix. Dezincified brass screws crumble under finger pressure and must be replaced.
Decisions on Cleaning, Replating, or Replacing Screws
The conservation principle of minimal intervention guides these decisions. If the original screw functions structurally and its appearance is acceptable (even with patina), the correct choice is to reuse it without modification. If cleaning is necessary — for example, to remove active rust that would continue damaging the screw and the surrounding wood — the least aggressive effective method should be used.
For steel screws with surface rust, soaking in a phosphoric acid solution (such as naval jelly) for 10–15 minutes dissolves the rust without significantly attacking the underlying metal. Rinse thoroughly, dry immediately, and apply a thin coat of paste wax (Renaissance Wax is the conservator’s standard) to inhibit future oxidation. For brass screws with tarnish, a paste of lemon juice and baking soda, applied gently with a soft cloth, removes tarnish without the aggressive polishing compounds that strip patina. Rinse and wax as with steel.
Replating — applying a new zinc, nickel, or brass plating to a screw — is rarely appropriate in restoration because it destroys the original surface character and is not reversible. The exception is when a screw must be used in a wet or corrosive environment (a kitchen piece, a bathroom fixture) where continued corrosion would damage the wood.
Replacement is appropriate when the original screw is structurally unsound, when it has been lost, or when the joint requires a different size due to previous damage. The replacement should match the original as closely as possible in material, gauge, length, head style, drive type, and thread profile — or should be clearly identifiable as a modern repair (e.g., by marking or documentation).
Sourcing Vintage Screws Responsibly
Reputable Suppliers, Salvaged Hardware, and Compatibility Tips
The vintage-screw supply chain is small but well-established. Sources fall into three categories: NOS (New Old Stock) dealers, salvage suppliers, and reproduction manufacturers.
NOS dealers sell unused screws from legacy manufacturing inventory — typically screws made by companies like Nettlefolds (GKN), American Screw Company, or Reed & Prince, found in warehouses or acquired from closed hardware stores. These screws are genuinely vintage in manufacture date and materials but have never been installed. The Vintage Screw Company in the UK is one such specialist, stocking Nettlefolds slotted wood screws across a wide range of gauges and lengths.
Salvage suppliers sell screws recovered from demolished buildings, disassembled furniture, and architectural salvage operations. These screws may show signs of previous use (compression marks on head undersides, wood fiber deposits, light thread wear) but are often period-appropriate for restoration work. eBay and Etsy are common retail channels; local architectural salvage yards sometimes carry bulk lots.
Reproduction manufacturers produce new screws to vintage specifications — slotted flat-head, with the correct thread profile, in brass or steel, without modern coatings. Prince Fastener’s custom fastener service can produce slotted flat-head and round-head wood screws in brass and carbon steel to specified gauge, length, and thread-pitch requirements, which makes them a viable option for large restoration projects that need consistent supply at scale — for example, a museum refurbishing an entire wing of period rooms.
Ethical Considerations and Conservation Guidelines
その American Institute for Conservation (AIC) Code of Ethics establishes principles relevant to screw selection: treatments should be reversible where possible, original material should be preserved when it can serve its function, and all interventions should be documented. In practice, this means that removing a functional original screw and replacing it with a “nicer looking” one is not conservation — it is vandalism of historical material. The correct approach is to reuse originals whenever possible, document any replacements with photographs and written notes, and store removed originals with the piece (in a labeled envelope taped inside a drawer, for example) so they remain associated with it.
For non-museum pieces — working furniture intended for daily use — the balance shifts slightly toward function. A stripped or corroded screw that cannot hold a door hinge securely is a safety concern, and replacement is appropriate. But even in functional restoration, the replacement should respect the piece’s character.

Installation Considerations for Restoration Projects
Preparing Holes and Reinforcements to Accept Vintage Screws
Vintage screws, with their shallower threads and softer metals, demand more careful hole preparation than modern hardened-steel screws. Skipping pilot holes — a mistake sometimes tolerated with modern screws in softwood — will often shear the head off a brass vintage screw or split the aged, dry wood around the hole.
Always drill a pilot hole, even in softwood. Size the pilot hole to the root diameter (the narrowest part of the threaded shaft), not the major diameter. In aged hardwoods (oak, mahogany, walnut that has dried for 50+ years and is significantly harder than freshly milled stock), size the pilot hole 1/64″ larger than the standard recommendation to reduce driving torque and prevent head shearing.
For countersunk flat-head screws, use a countersink bit sized to match the screw head’s diameter and angle. Vintage flat-head screws typically have an 82° countersink angle, the same as modern standards, but verify this if the screw is of unusual origin.
When driving brass screws into hardwood, a time-tested technique is to first drive a steel screw of the same gauge and length into the pilot hole to cut the threads, then remove it and drive the brass screw into the pre-threaded hole. This dramatically reduces the torque required to seat the brass screw and virtually eliminates the risk of twisted-off heads — a failure mode that brass’s lower tensile strength makes it particularly prone to.
Torque, Alignment, and Avoiding Damage to Aged Wood
Hand-driving with a properly fitting screwdriver is always preferred over power driving for restoration work. A power driver’s speed and torque are calibrated for modern screws in modern materials; they will overtorque a vintage screw in aged wood before the operator can react. Use a flat-blade screwdriver whose tip width matches the slot length and whose thickness matches the slot width — a loose-fitting driver is the primary cause of damaged slots.
Slot alignment is a mark of quality in restoration. On visible screws (those attaching surface hardware), all slots should be oriented the same way — typically vertical or aligned with the wood grain. This detail, while purely aesthetic, is the first thing an experienced eye will check, and getting it right signals the level of care taken throughout the restoration.
In aged wood, the area around an existing screw hole may be compressed, split, or punky (softened by partial decay). Before installing a screw, assess the surrounding wood by pressing a fingernail into it: if it dents easily, the wood may not hold a screw adequately. Consolidation with a thin cyanoacrylate (CA) glue or a diluted epoxy, allowed to cure fully before drilling, restores holding power without removing material.
Maintenance, Care, and Long-Term Preservation
Cleaning Methods That Preserve Patina
Patina — the accumulated surface oxidation and handling wear on a screw — is a component of the furniture’s history and should be preserved whenever possible. The cleaning goal for a vintage screw is to remove active corrosion (which continues to damage the metal and surrounding wood) while leaving stable patina (which protects the metal and looks appropriate) intact.
For steel screws, wiping with a dry soft cloth removes loose surface dust. For more embedded grime, a cloth dampened (not wet) with mineral spirits dissolves wax, oil, and organic deposits without attacking the oxide layer. Avoid water-based cleaners, which promote flash rusting on bare steel areas.
For brass screws, a microfiber cloth dampened with warm water and a drop of mild dish soap removes surface grime. Rinse by wiping with a damp cloth (not by immersing), and dry immediately. Avoid abrasive cleaners (including toothpaste, which many online guides recommend but which contains silica particles that scratch the surface and accelerate tarnishing).
After cleaning, apply a thin coat of microcrystalline paste wax (Renaissance Wax or equivalent) to all exposed metal surfaces. The wax forms a breathable, reversible barrier that slows oxidation without altering the screw’s appearance. Reapply annually or whenever the surface appears dry.
Lubrication, Protection, and Storage Practices
Screws that are being stored (either removed originals or NOS stock awaiting use) should be individually wrapped in acid-free tissue and stored in a dry, stable-temperature environment. Avoid plastic bags, which can trap moisture and promote corrosion. Avoid rubber bands, which off-gas sulfur compounds that tarnish brass and copper alloys.
For screws in situ (installed in furniture), the primary protection is environmental control: maintaining relative humidity between 40% and 60% minimizes both corrosion (which accelerates above 60% RH) and wood shrinkage (which can loosen screw joints below 30% RH). This is the same humidity range recommended for the wood itself, so controlling the environment for the furniture simultaneously protects its fasteners.
Common Pitfalls and Troubleshooting
Mismatched Sizes, Incompatible Threads, and Finish Clashes
The most common error in restoration screw selection is gauge mismatch — using a #8 screw in a hole drilled for a #6, or vice versa. An oversized screw in a too-small clearance hole will crack the surrounding wood. An undersized screw in an enlarged hole will not clamp the joint properly and may rattle loose under use. Always measure, never estimate.
Thread-pitch mismatch is subtler but equally problematic. A modern screw with finer threads (more TPI) driven into a hole previously threaded by a coarser vintage screw will not engage the existing thread tracks and will cut new ones at a different pitch, weakening the hole’s holding power. When possible, match the original TPI exactly.
Finish clashes — a bright zinc-plated screw next to a patinated brass hinge, or a shiny new brass screw among tarnished originals — undermine the visual coherence of a restoration. If the replacement screw’s finish does not match, consider aging it artificially. Brass can be darkened with a proprietary darkening solution (available from jewelry-supply and metalworking suppliers) or with a fuming process using diluted ammonia in a sealed container. Steel can be aged with a vinegar-and-salt solution applied to the surface, which produces a controlled rust layer that can then be sealed with wax.
Tips for Aligning with Original Joinery Without Compromising Integrity
In complex joinery — such as a mortise-and-tenon joint that is also pinned and screwed, or a dovetailed case corner that uses screws to attach a back panel — the screw serves a specific mechanical function within a larger joint system. Understanding this function prevents damaging adjacent joint elements during screw installation.
For example, in a drop-leaf table, the screws attaching the rule joint hinge must be precisely positioned relative to the hinge knuckle’s center line. If a replacement screw is even slightly longer than the original, its tip may protrude through the leaf’s underside or bear against the adjacent hinge barrel, preventing the joint from folding properly. Conversely, a screw that is too short may not reach solid wood beneath a countersink, leaving the hinge loose.
The principle is always: understand the joint before touching the screws. Disassemble only as far as necessary, document the position and orientation of every screw with photographs before removal, and reassemble in the reverse order.
Common Restoration Screw Failures by Root Cause
Survey of 180 restoration professionals — percentage who reported each failure type as “frequently encountered.”
Practical Buying Checklist and Quick-Reference Guide
Key Questions to Ask Sellers
Whether you are buying from an NOS dealer, a salvage yard, or a reproduction manufacturer, the following questions separate knowledgeable sellers from those who are guessing.
What is the manufacturing origin? A reputable seller can tell you the maker (Nettlefolds, American Screw Co., etc.), the approximate era of manufacture, and whether the screws are NOS, salvage, or reproduction. “Old screws” is not a sufficient answer.
Are these solid brass or brass-plated steel? This is the most common deception in the vintage-screw market. Ask explicitly, and confirm with a magnet if possible (many sellers will accommodate this request if you explain the reason).
What is the exact gauge, length, and head style? Sellers who describe screws only by slot type and approximate length (“small flat-head slotted screws, about an inch long”) may not have measured them accurately. Ask for gauge number and decimal-inch or fractional-inch length.
What is the thread pitch? For pre-standardization screws (before approximately 1870), pitch can vary. A seller who has measured TPI is a seller who understands their product.
What is the return policy? Vintage screws are often sold in lots, and it is common to find that 10–15% of a lot contains screws of a different size, material, or condition than described. A fair return policy protects both parties.
A Step-by-Step Checklist for Evaluating a Potential Purchase
| ステップ | アクション | Pass / Fail Criteria |
|---|---|---|
| 1 | Visual inspection of drive type | Slotted = consistent with pre-1930s. Cross-head = post-1930s or modern. |
| 2 | Magnet test (brass screws) | Non-magnetic = solid brass. Magnetic = plated steel — reject if sold as brass. |
| 3 | Measure gauge with calipers | Matches seller’s stated gauge ± 0.005″. |
| 4 | Measure length | Matches stated length ± 1/16″. |
| 5 | Check thread pitch with gauge | Consistent TPI across sample; matches stated specification. |
| 6 | Examine slot centering (10× loupe) | Consistent with claimed era (off-center = pre-1856; centered = post-1856). |
| 7 | Check tip shape | Blunt = pre-1846; pointed = post-1846. Consistent with claimed era. |
| 8 | Assess thread condition | Sharp crests, no visible pitting or flattening = serviceable. |
| 9 | Evaluate patina consistency | Uniform across lot = genuine. Mixed patinas = mixed sources — examine individually. |
| 10 | Confirm return policy | Seller accepts returns for misdescribed items. |
Case Studies and Project-Oriented Examples
Simple Restoration vs. Complex Joinery Scenarios
Case 1: Replacing a missing hinge screw on an 1880s oak washstand. The remaining three screws are slotted flat-head steel, gauge #7 × ¾″, with gimlet points and centered machine-cut slots — consistent with post-1856 manufacture. The missing screw’s hole measures 0.125″ (root diameter), confirming #7 gauge. The fix is straightforward: source a single NOS or reproduction slotted flat-head steel wood screw, #7 × ¾″, unplated. Drive with a hand screwdriver after confirming the existing pilot hole is clear of debris. Age the screw head with a vinegar-and-salt solution and seal with wax to approximate the patina of the originals.
Case 2: Reattaching a delaminated rule-joint hinge leaf on a 1760s Philadelphia walnut dining table. The original screws are hand-forged: blunt-tipped, straight-shanked, with irregular threads and off-center slots — two in steel, one in brass (the brass one replaces a lost original, based on its different patina). The walnut around two of the three holes has split. The conservation approach: consolidate the split walnut with hide glue (reversible), clamp and cure for 24 hours, then carefully re-drill pilot holes using the original screw as a thread template. Reinstall the two original steel screws. For the brass replacement: document it photographically, note its likely 19th-century replacement date, and reinstall it — it is now part of the piece’s documented history.
Before-and-After Considerations with Screw Selection
An instructive comparison involves a pair of identical 1920s mahogany side tables acquired by a dealer. Table A was “restored” by a previous owner who replaced all original brass hardware screws with modern #8 × ¾″ Phillips-head zinc-plated steel screws — readily available and structurally adequate. Table B retained its original slotted brass screws, tarnished but intact. At auction, Table B sold for $340 more than Table A, despite identical structural condition. The appraiser’s notes cited “non-original hardware fasteners” as the reason for the downgrade on Table A. The cost of the modern screws that devalued Table A was approximately $3.80. The cost of proper brass slotted replacements would have been approximately $12.00.
This example illustrates a principle that applies across the restoration market: the cheapest screw is never the one that costs the least per unit — it is the one that does not diminish the piece’s value, authenticity, or structural integrity.

Maintaining Historical Accuracy While Ensuring Safety
Balancing Aesthetics with Structural Requirements
There are situations where a period-correct screw cannot safely serve the structural demands of the joint — a rocking chair’s arm attachment, for example, where a cracked or corroded original screw could fail under the dynamic loads of daily use. In these cases, the restorer faces a genuine ethical decision.
The recommended approach is a layered strategy: use a structurally adequate modern fastener (stainless steel, correct gauge, slotted flat-head to minimize visual anachronism) for the primary structural function, and document the substitution thoroughly. If the original screw is intact but weakened, retain it in labeled storage with the piece. If both structural security and period appearance are required, consider a two-fastener approach: a hidden modern screw providing structural strength, supplemented by a visible vintage screw providing authentic appearance in a non-load-bearing position.
Documentation and Record-Keeping for Restorations
Professional conservators document every fastener decision in a treatment report. For non-professional restorers, a simplified version of this practice adds enormous value: photograph every screw before removal (including its position in the piece), record its material, gauge, length, and condition in a notebook or digital file, note whether it was reused, replaced, or retired, and if replaced, record the replacement’s specifications and source.
This documentation travels with the piece. Tape a printed summary inside a drawer, glue an envelope containing removed originals to the back panel, or (for valuable pieces) create a standalone file. Future restorers — who may include yourself, decades later — will be grateful for every data point.
Video: The Forgotten History of Wood Screws
This detailed video by Stumpy Nubs walks through the entire evolution of wood screw technology, from hand-forged 15th-century fasteners to modern production methods — essential context for any restorer identifying screws by era:
Conclusion and Next Steps
Recap of Critical Decisions When Choosing Vintage Screws
Every vintage screw selection comes down to a chain of five decisions. First, date the piece to establish the era-appropriate screw type (hand-forged, early machine, full machine, or modern). Second, measure the existing hardware — gauge, length, thread pitch, head style — to define the exact specification needed. Third, assess the original screws’ condition to determine whether they can be reused, need cleaning, or must be replaced. Fourth, select the replacement material (steel, brass, bronze, stainless) based on the original material, the wood species, and the piece’s intended environment. Fifth, source from a verified supplier who can confirm material composition, dimensional accuracy, and era-appropriate manufacturing characteristics.
At each decision point, the default should be conservation over convenience: reuse over replace, period materials over modern substitutes, hand-driving over power-driving, documentation over assumption.
How to Continue Learning and Sourcing Responsibly
The restorer’s education never stops. The following resources provide ongoing reference and deepening knowledge: the WAG-AIC publication on American wood screw development (free PDF, the academic standard), Fine Woodworking magazine (regular articles on restoration techniques and hardware sourcing), the Prince Fastener wood screw reference library (technical specifications, material guides, and sizing charts), and local furniture-conservation workshops offered by museums and woodworking schools.
The investment in getting screws right is tiny relative to the hours spent on every other aspect of restoration. A box of correct slotted brass wood screws costs less than a single can of the finish that will go over them. The knowledge to choose correctly costs nothing beyond the time to read a guide like this one. The payoff — a restoration that passes expert inspection, holds together for another century, and honors the original maker’s craft — is incalculable.

Frequently Asked Questions (FAQ)
What defines a screw as vintage for furniture restoration?
A vintage screw is one whose manufacturing characteristics — thread profile, head style, drive type, material, and surface finish — are consistent with the era of the furniture being restored. In practical terms, this means slotted-drive screws made before the introduction of Phillips-head production in the late 1930s. The specific features that identify a screw’s era include tip shape (blunt pre-1846, pointed post-1846), slot centering (off-center pre-1856, centered post-1856), thread regularity (irregular pre-1812, regular post-1812), and shaft taper (straight pre-1846, tapered post-1846). Using a screw with characteristics from the wrong era is immediately detectable by knowledgeable appraisers and conservators.
How do I determine the correct screw size for an original hole?
Measure the clearance hole (the unthreaded hole in the upper piece) with dial calipers to determine the original shank diameter, which corresponds to the screw gauge. Measure the pilot hole (the threaded hole in the lower piece) to confirm the root diameter. Cross-reference both measurements against a wood screw size chart. If the original screw is available, measure its shank diameter directly. For thread pitch, use a thread pitch gauge pressed against the screw’s threads — the blade that fits perfectly between the crests indicates the TPI.
What materials were commonly used in vintage screws and their pros/cons?
Mild (low-carbon) steel was the most common material, accounting for approximately 60% of pre-1930 furniture screws. It is strong and inexpensive but corrodes in humid environments and stains acidic woods (oak, walnut, chestnut) through a chemical reaction with tannic acid. Brass (about 28% of vintage screws) is corrosion-resistant and develops an attractive patina, but it is soft — susceptible to stripped slots and sheared heads if driven without a pilot hole. Silicon bronze (about 6%) combines the corrosion resistance of brass with greater strength, but is rare in standard furniture. Stainless steel is a modern material not found in authentic vintage hardware, though it serves well for hidden structural repairs.
Where can I source authentic vintage screws responsibly?
Three primary channels exist. NOS (New Old Stock) dealers sell unused screws from legacy manufacturing inventory — check The Vintage Screw Company for UK-origin Nettlefolds stock. Salvage yards and online marketplaces (eBay, Etsy) offer screws recovered from demolished buildings and disassembled furniture — always verify material with a magnet test (brass is non-magnetic). Reproduction manufacturers produce new screws to vintage specifications; Prince Fastener’s brass screw line includes slotted flat-head and round-head configurations in gauges #2 through #14, and their custom service can replicate specific historical profiles for large-scale restoration projects.
How should I care for metal screws to preserve patina and prevent damage?
For steel screws, remove active rust (orange powder) with a phosphoric acid solution, rinse thoroughly, dry immediately, and apply a thin coat of microcrystalline paste wax (Renaissance Wax). For brass screws, clean surface grime with warm water and mild soap on a soft cloth — avoid abrasive cleaners that strip the brown-gold patina. Apply paste wax after cleaning and reapply annually. Store removed screws individually wrapped in acid-free tissue in a dry environment; avoid plastic bags (which trap moisture) and rubber bands (which off-gas sulfur that tarnishes copper alloys). For screws in situ, maintain indoor relative humidity between 40% and 60% to minimize both corrosion and wood shrinkage.
Can I use modern screws in a restoration if vintage ones are unavailable?
Yes, but with conditions. The replacement should match the original as closely as possible in gauge, length, head style, drive type (slotted), and material. A modern slotted flat-head brass wood screw is visually acceptable in most restorations. Avoid Phillips, Pozidriv, or Torx drives in any visible location on pre-1930s furniture. Avoid zinc-plated or coated screws where unplated originals were used. If an exact match is impossible, use the closest available match and document the substitution in a treatment record stored with the piece. For valuable or museum-quality pieces, consult a professional conservator before making substitutions.
How can I tell if a “brass” screw is genuine brass or brass-plated steel?
The simplest test is a magnet: genuine brass (a copper-zinc alloy) is non-magnetic and will not attract a magnet at all. Brass-plated steel will be pulled toward a magnet strongly. Under magnification, plated screws may also show wear-through points where the bright steel substrate is visible beneath the brass coating, particularly on the thread crests and the slot edges. Weight is another clue: brass is denser than steel, so a genuine brass screw feels heavier than a plated steel screw of the same size — though this difference is subtle and unreliable as a sole indicator.
What is the best way to drive brass screws into hardwood without breaking them?
Always drill a pilot hole sized to the screw’s root diameter, and in aged hardwood, size it 1/64″ larger than standard. Apply a lubricant to the threads — paste wax, beeswax, or bar soap all work. The most reliable method for hardwood is the “steel-first” technique: drive a steel screw of the same gauge and length to cut the threads, remove it, then drive the brass screw into the pre-threaded hole. Use a hand screwdriver, not a power driver, and apply slow, steady torque. If resistance increases suddenly, stop and back out slightly — sudden resistance means the screw is binding, and additional force will shear the head.
Should I align the screw slots in a particular direction during restoration?
Yes. On visible hardware (hinges, escutcheons, pulls, lock plates), all screw slots should be aligned the same direction — traditionally vertical, or parallel to the wood grain, depending on the convention of the piece’s era and origin. This is a hallmark of quality craftsmanship that original makers observed, and a properly restored piece should maintain it. On concealed screws (inside case pieces, under tabletops), alignment is not critical but is still considered good practice. Aligning slots takes only a few extra seconds per screw and signals the care taken throughout the restoration.
How do I document screw decisions for future reference?
At minimum, photograph each screw in place before removal (including a ruler for scale), record its material, gauge, length, head style, drive type, and condition in a written log, and note the action taken (reused, cleaned, replaced). For replaced screws, record the replacement’s source, material, and specifications. Store removed original screws in a labeled acid-free envelope taped inside the piece (typically on the back of a drawer or the underside of a shelf). For high-value pieces, create a standalone treatment report following the format recommended by the American Institute for Conservation.